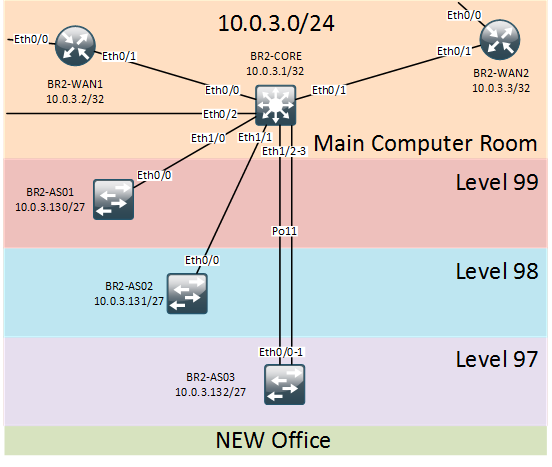
Prerequisites
It is assumed that by this time all detailed network design information is known including interfaces numbers, VLANs, IP addresses and LAGs. This information will be used as an input to configuration automation scripts.

The inventory file is updated with a new branch-2 group
[branch-2]
BR2-CORE ansible_ssh_host=10.0.3.1
BR2-WAN1 ansible_ssh_host=10.0.3.2
BR2-WAN2 ansible_ssh_host=10.0.3.3
BR2-AS01 ansible_ssh_host=10.0.3.130
BR2-AS02 ansible_ssh_host=10.0.3.131
BR2-AS03 ansible_ssh_host=10.0.3.132
Creating device bootstrap configuration
A lot of times when building a new network it is required to create a bootstrap config that would have some basic AAA configuration along with the layer 2 and layer 3 links configuration. Since we went through the AAA configuration in the previous post I will omit that bit and get straight to the configuration of L2/L3 links. My personal rule of thumb is to configure all intra-site links as layer 2 trunks, including the links between the routed devices. This allows for greater flexibility in the future in case some traffic will need to get steered through a particular device.
The goal is to have configuration that would be copy-paste-friendly and would not require re-ordering or re-running. Therefore, it is important to apply configuration in the specific order:
- Layer 2 LAGs
- Layer 2 port configuration
- Layer 3 ip addressing
The input information will be provided through a file called interconnects stored in the site-specific variable directory branch-2. Below is an abridged version of the file ./group_vars/branch-2/interconnects demonstrating the configuration of interfaces on the core switch. As always full version is available in my github repository.
link_aggregation:
  BR2-CORE:
    Po11: [Eth0/2, Eth0/3]

l2_links:
  BR2-CORE:
    Eth0/0: 11
    Eth0/1: 12
    Eth1/0: 10,20,30,40,50
    Eth1/1: except 40
    Po11:   10-50

l3_intf:
  BR2-CORE:
    Loopback0: 10.0.3.1/32
    Vlan11: 10.0.1.38/29
    Vlan12: 10.0.1.46/29
    Vlan10: 10.0.3.65/27
    Vlan20: 10.0.3.97/27
    Vlan30: 10.0.3.129/27
    Vlan40: 10.0.3.193/27
    Vlan50: 10.0.3.161/27
This information is used by the bootstrap Ansible role to construct an interface configuration script. Here’s the example of LAG configuration template. It iterates over all devices in link_aggregation variable and configures LACP protocol on each participating interface.
{% if inventory_hostname in link_aggregation %}
  {% for channel_number in link_aggregation[inventory_hostname] %}
    {% for interface in link_aggregation[inventory_hostname][channel_number] %}
interface {{ interface }}
  channel-group {{ channel_number.split("Po")[1] }} mode active
  no shutdown
   {% endfor %}
  {% endfor %}
{% endif %}
When configuring IP address information it’s handy to use the built-in Ansible’s ipaddr filter which can translate a prefix notation into Cisco’s standard ip_address netmask as shown below:
 {% if inventory_hostname in l3_intf and inventory_hostname in groups['routers'] and not inventory_hostname in groups['switches'] %}
  {% for interface in l3_intf[inventory_hostname] %}
interface {{ interface }}
  ip address {{ l3_intf[inventory_hostname][interface] | ipaddr('address') }} {{ l3_intf[inventory_hostname][interface] | ipaddr('netmask') }}
  no shutdown
  {% endfor %}
{% endif %}
Creating OSPF routing configuration
OSPF configuration will adhere to the following simple conventions:
- All routed devices participate in OSPF
- Every device advertises all its directly connected links
- All links are passive by default with the exception of inter-device links
- A single OSPF area 0 is used
Another important aspect is separation of site-specific from enterprise-global configuration. The rule of thumb in this case would be to put as much information as possible into the global scope, keeping the site scope small. In our case all global variables and settings should reside under ./group_vars/routing directory:
---
ospf:
  global:
    - default auto-cost reference-bandwidth 100000
    - router-id {{ l3_intf[inventory_hostname][management_interface] | ipaddr('address') }}
    - network 0.0.0.0 255.255.255.255 area 0
    - passive-interface default
Site-specific OSPF variables will only contain a list of active interfaces that should form OSPF adjacencies:
---
ospf_intf_list:
  BR2-CORE: [Vlan11, Vlan12]
  BR2-WAN1: [Eth0/1.11]
  BR2-WAN2: [Eth0/1.12]
Once again, a special routing role is created with a template making use of all of the configured variables:
router ospf 1
{% for option in ospf.global %}
  {{ option }}
{% endfor %}
{% for interface in ospf_intf_list[inventory_hostname] %}
  no passive-interface {{ interface }}
{% endfor %}
The resulting configuration for the core switch would like like this:
router ospf 1
  default auto-cost reference-bandwidth 100000
  router-id 10.0.3.1
  network 0.0.0.0 255.255.255.255 area 0
  passive-interface default
  no passive-interface Vlan11
  no passive-interface Vlan12
Just a reminder that full versions of templates, files and playbooks can be found on github.
That’s it for the basic L2/L3 and routing configuration. In the next post I will show how to automate a standard BGP configuration.