In the previous posts about NETCONF and RESTCONF I’ve demonstrated how to interact with Cisco IOS XE device directly from the Linux shell of my development VM. This approach works fine in some cases, e.g. whenever I setup a new DC fabric, I would make calls directly to the devices I’m configuring. However, it becomes impractical in the Ops world where change is constant and involves a large number of devices. This is where centralised service orchestrators come to the fore. The prime examples of such platforms are Network Services Orchestrator from Tail-f/Cisco and open-source project OpenDaylight. In this post we’ll concentrate on ODL and how to make it work with Cisco IOS XE. Additionally, I’ll show how to use an open-source tool YDK to generate Python bindings for native YANG models and how it compares with pyangbind.
OpenDaylight primer
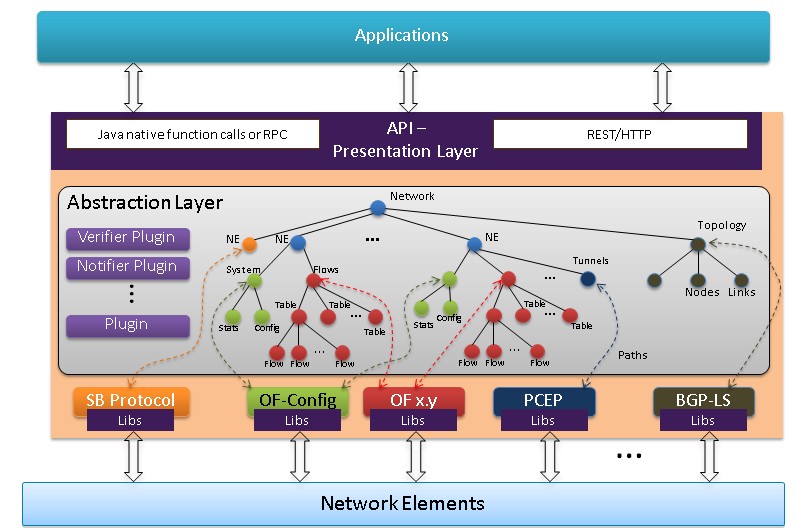
OpenDaylight is a swiss army knife of SDN controllers. At the moment it is comprised of dozens of projects implementing all possible sorts of SDN functionality starting from Openflow controller all the way up to L3VPN orchestrator. ODL speaks most of the modern Southbound protocols like Openflow, SNMP, NETCONF and BGP. The brain of the controller is in the Service Abstraction Layer, a framework to model all network-related characteristics and properties. All logic inside SAL is modelled in YANG which is why I called it the godfather of YANG models. Towards the end users ODL exposes Java function calls for applications running on the same host and REST API for application running remotely.
OpenDaylight has several commercial offerings from companies involved in its development. Most notable ones are from Brocade and Cisco. Here I will allow myself a bit of a rant, feel free to skip it to go straight to the technical stuff.
One thing I find interesting is that Cisco are being so secretive about their Open SDN Controller, perhaps due to the earlier market pressure to come up with a single SDN story, but still have a very large number of contributors to this open-source project. It could be the case of having an egg in each basket, but the number of Cisco’s employees involved in ODL development is substantial. I wonder if, now that the use cases for ACI and ODL have finally formed and ACI still not showing the uptake originally expected, Cisco will change their strategy and start promoting ODL more aggressively, or at least stop hiding it deep in the bowels of cisco.com. Or, perhaps, it will always stay in the shade of Tail-f’s NSC and Insieme’s ACI and will be used only for customer with unique requirements, e.g. to have both OpenStack and network devices managed through the same controller.
Environment setup
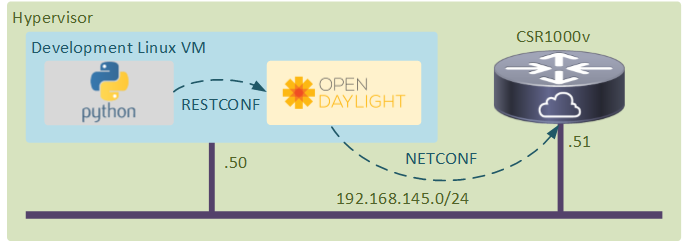
We’ll use the same environment we’ve setup in the previous posts, consisting of a CSR1K and a Linux VM connected to the same network inside my hypervisor. IOS XE device needs to have netconf-yang configured in order to enable the northbound NETCONF interface.
On the same Linux VM, I’ve downloaded and launched the latest version of ODL (Boron-SR2), and enabled NETCONF and RESTCONF plugins.
unzip distribution-karaf-0.5.2-Boron-SR2.zip
mv distribution-karaf-0.5.2-Boron-SR2 odl-0.5.2
cd odl-0.5.2/
./bin/karaf
opendaylight-user@root>feature:install odl-netconf-connector-all
opendaylight-user@root>feature:install odl-restconf-all
We’ll use NETCONF to connect to Cisco IOS XE device and RESTCONF to interact with ODL from a Linux shell.
It might be useful to turn on logging in karaf console to catch any errors we might encounter later:
opendaylight-user@root>log:tail
Connecting IOS XE to ODL
According to ODL NETCONF user guide, in order to connect a new device to the controller, we need to create an XML document which will include the IP, port and user credentials of the IOS XE device. Here’s the excerpt from the full XML document:
<module xmlns="urn:opendaylight:params:xml:ns:yang:controller:config">
  <type xmlns:prefix="urn:opendaylight:params:xml:ns:yang:controller:md:sal:connector:netconf">prefix:sal-netconf-connector</type>
  <name>CSR1K</name>
  <address xmlns="urn:opendaylight:params:xml:ns:yang:controller:md:sal:connector:netconf">192.168.145.51</address>
  <port xmlns="urn:opendaylight:params:xml:ns:yang:controller:md:sal:connector:netconf">830</port>
  <username xmlns="urn:opendaylight:params:xml:ns:yang:controller:md:sal:connector:netconf">admin</username>
  <password xmlns="urn:opendaylight:params:xml:ns:yang:controller:md:sal:connector:netconf">admin</password>
Assuming this XML is saved in a file called new_device.xml.1, we can use curl to send it to ODL’s netconf-connector plugin:
curl -v -k -u admin:admin -H "Content-Type: application/xml" -X POST \
 http://localhost:8181/restconf/config/network-topology:network-topology\
 /topology/topology-netconf/node/controller-config/yang-ext:mount/config:modules\
  -d @new_device.xml.1
When the controller gets this information it will try to connect to the device via NETCONF and do the following three things:
- Discover device capabilities advertised in the Hello message
- Download all YANG models advertised by the device into the
./cache/schemadirectory - Go through all of the imports in each model and verify that they can be satisfied
After ODL downloads all of the 260 available models (can take up to 20 minutes) we will see the following errors in the karaf console:
Netconf device does not provide all yang models reported in hello message capabilities
Unable to build schema context, unsatisfied imports
Initialization in sal failed, disconnecting from device
No more sources for schema context
Due to inconsistencies between the advertised and the available models, ODL fails to build the full device YANG schema context, which ultimately results in inability to connect the device to the controller. However, we won’t need all of the 260 models advertised by the device. In fact, most of the configuration can be done through a single Cisco native YANG model, ned. With ODL it is possible to override the default capabilities advertised in the Hello message and “pin” only the ones that are going to be used. Assuming that ODL has downloaded most of the models at the previous step, we can simply tell it use the selected few with the following additions to the XML document:
<yang-module-capabilities xmlns="urn:opendaylight:params:xml:ns:yang:controller:md:sal:connector:netconf">
<override>true</override>
<capability xmlns="urn:opendaylight:params:xml:ns:yang:controller:md:sal:connector:netconf">
urn:ietf:params:xml:ns:yang:ietf-inet-types?module=ietf-inet-types&revision=2013-07-15
</capability>
<capability xmlns="urn:opendaylight:params:xml:ns:yang:controller:md:sal:connector:netconf">
http://cisco.com/ns/yang/ned/ios?module=ned&revision=2016-10-24
</capability>
Assuming the updated XML is saved in new_device.xml.2 file, the following command will update the current configuration of CSR1K device:
curl -v -k -u admin:admin -H "Content-Type: application/xml" -X PUT \
http://localhost:8181/restconf/config/network-topology:network-topology\
/topology/topology-netconf/node/controller-config\
/yang-ext:mount/config:modules/module\
/odl-sal-netconf-connector-cfg:sal-netconf-connector\
/CSR1K -d @new_device.xml.2
We can then verify that the device has been successfully mounted to the controller:
curl -v -k -u admin:admin http://localhost:8181/restconf/operational\
/network-topology:network-topology/ | python -m json.tool
The output should look similar to the following with the connection-status set to connected and no detected unavailable-capabilities:
"netconf-node-topology:connection-status": "connected",
"netconf-node-topology:host": "192.168.145.51",
"netconf-node-topology:port": 830,
"netconf-node-topology:unavailable-capabilities": {},
"node-id": "CSR1K"
At this point we should be able to interact with IOS XE’s native YANG model through ODL’s RESTCONF interface using the following URL
 http://localhost:8181/restconf/config/network-topology:network-topology\
 /topology/topology-netconf/node/CSR1K/yang-ext:mount/ned:native
The only thing that’s missing is the actual configuration data. To generate it, I’ll use a new open-source tool called YDK.
YDK primer
Yang Development Kit is a suite of tools to work with NETCONF/RESTCONF interfaces of a network device. The way I see it, YDK accomplishes two things:
- Generates API bindings for programming languages (Python and C++) from YANG models
- Creates an abstraction layer to interact with southbound protocols (NETCONF or RESTCONF) in a uniform way
There’s a lot of overlap between the tools that we’ve used before and YDK. Effectively YDK combines in itself the functions of a NETCONF client, a REST client, pyangbind and pyang(the latter is used internally for model verification). Since one of the main functions of YDK is API generation I thought it’d be interesting to know how it compares to Rob Shakir’s pyangbind plugin. The following information is what I’ve managed to find on the Internet and from the comment of Santiago Alvarez below:
| Feature | Pyangbind | YDK |
|---|---|---|
| PL support | Python | Python, C++ with Ruby and Go in the pipeline |
| Serialization | JSON, XML | only XML at this stage with JSON coming up in a few weeks |
| Southbound interfaces | N/A | NETCONF, RESTCONF with ODL coming up in a few weeks |
| Support | Cisco’s devnet team | Rob Shakir |
So it looks like YDK is a very promising alternative to pyangbind, however I, personally, would still prefer to use pyangbind due to familiarity, simplicity and the fact that I don’t need the above extra features offered by YDK right now. However, given that YDK has been able to achieve so much in just under one year of its existence, I don’t discount the possibility that I may switch to YDK as it becomes more mature and feature-rich.
Python binding generation with YDK-GEN
One of the first things we need to do is install YDK-GEN, the tools responsible for API bindings generation, and it’s core Python packages on the local machine. The following few commands are my version of the official installation procedure:
git clone https://github.com/CiscoDevNet/ydk-gen.git ~/ydk-gen
pip install -r ~/ydk-gen/requirements.txt
export YDKGEN_HOME=~/ydk-gen/
~/ydk-gen/generate.py --python --core
pip install ~/ydk-gen/gen-api/python/ydk/dist/ydk*.tar.gz
YDK-GEN generates Python bindings based on the so-called bundle profile. This is a simple JSON document which lists all YANG models to include in the output package. In our case we’d need to include a ned model along with all its imports. The sample below shows only the model specification. Refer to my Github repo for a complete bundle profile for Cisco IOS XE native YANG model.
{"models":{"git":[{"url":"https://github.com/YangModels/yang.git",
  "commits":[{"commitid":"6f4a025431103f8cbbf3405ce01bdc61d0811b1d",
    "file":["vendor/cisco/xe/1641/ned.yang",
      "vendor/cisco/xe/1641/tailf-common.yang",
      "vendor/cisco/xe/1641/tailf-meta-extensions.yang",
      "vendor/cisco/xe/1641/tailf-cli-extensions.yang",
      "standard/ietf/RFC/ietf-inet-types.yang",
      "standard/ietf/RFC/ietf-yang-types.yang"]
      }]}]}}
Assuming that the IOS XE bundle profile is saved in a file called cisco-ios-xe_0_1_0.json, we can use YDK to generate and install the Python binding package:
~/ydk-gen/generate.py --python --bundle cisco-ios-xe_0_1_0.json -v
pip install ~/ydk-gen/gen-api/python/cisco_ios_xe-bundle/dist/ydk*.tar.gz
Configuring BGP with YDK
Now we can start configuring BGP using our newly generated Python package. First, we need to create an instance of BGP configuration data:
from ydk.models.cisco_ios_xe.ned import Native
bgp = Native().router.Bgp()
The configuration will follow the pattern defined in the original model, which is why it’s important to understand the internal structure of a YANG model. YANG leafs are represented as simple instance attributes. All YANG containers need to be explicitly instantiated, just like the Native and Bgp classes in the example above. Presence containers (router in the above example) will be instantiated at the same time as its parent container, inside the __init__ function of the Native class. Don’t worry if this doesn’t make sense, use iPython or any IDE with autocompletion and after a few tries, you’ll get the hang of it.
Let’s see how we can set the local BGP AS number and add a new BGP peer to the neighbor list.
bgp.id = 100
new_neighbor = bgp.Neighbor()
new_neighbor.id = '2.2.2.2'
new_neighbor.remote_as = 65100
bgp.neighbor.append(new_neighbor)
At this point of time all data is stored inside the instance of a Bgp class. In order to get an XML representation of it, we need to use YDK’s XML provider and encoding service:
from ydk.providers import CodecServiceProvider
from ydk.services import CodecService
provider = CodecServiceProvider(type="xml")
codec = CodecService()
xml_string = codec.encode(provider, bgp)
print xml_string
All what we’ve got left now is to send the data to ODL:
import requests
url = ("http://localhost:8181/restconf"
       "/config/network-topology:network-topology"
       "/topology/topology-netconf/node"
       "/CSR1K/yang-ext:mount/ned:native"
       "/router")
headers = {'Content-Type': 'application/xml'}
result = requests.post(url, auth=('admin', 'admin'), headers=headers, data=xml_string)
print result.status_code
The controller should have returned the status code 204 No Content, meaning that configuration has been changed successfully.
Verification
Back at the IOS XE CLI we can see the new BGP configuration that has been pushed down from the controller.
TEST#sh run | i router
router bgp 100
 bgp log-neighbor-changes
 neighbor 2.2.2.2 remote-as 65100
More examples
You can find a shorter version of the above procedure in my ODL 101 repo.