In one of his recent posts, Ivan raises a question: “I can’t grasp why Cumulus releases a Vagrant box, but not a Docker container”. Coincidentally, only a few weeks before that I had managed to create a Cumulus Linux container image. Since then, I’ve done a lot of testing and discovered limitations of the pure containerised approach and how to overcome them while still retaining the container user experience. This post is a documentation of my journey from the early days of running Cumulus on Docker to the integration with containerlab and, finally, running Cumulus in microVMs backed by AWS’s Firecracker and Weavework’s Ignite.
Innovation Trigger
One of the main reason for running containerised infrastructure is the famous Docker UX. Containers existed for a very long time but they only became mainstream when docker released their container engine. The simplicity of a typical docker workflow (build, ship, run) made it accessible to a large number of not-so-technical users and was the key to its popularity.
Virtualised infrastructure, including networking operating systems, has mainly been distributed in a VM form-factor, retaining much of the look and feel of the real hardware for the software processes running on top. However it didn’t stop people from looking for a better and easier way to run and test it, some of the smartest people in the industry are always looking for an alternative to a traditional Libvirt/Vagrant experience.
While VM tooling has been pretty much stagnant for the last decade (think Vagrant), containers have amassed a huge ecosystem of tools and an active community around it. Specifically in the networking area, in the last few years we’ve seen commercial companies like Tesuto and multiple open-source projects like vrnetlab, docker-topo, k8s-topo and, most recently containerlab.
So when I joined Nvidia in April 2021, I thought it’d be a fun experiment for me to try to containerise Cumulus Linux and learn how the operating system works in the process.
Peak of Inflated Expectations
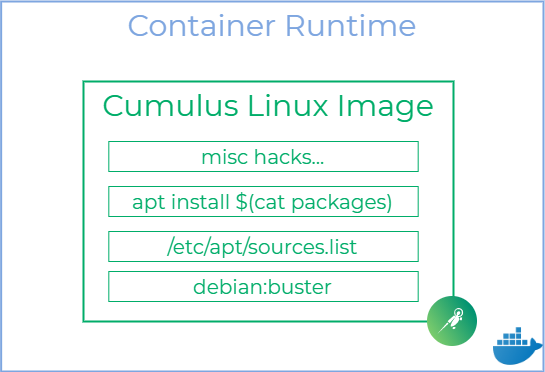
Building a container image was the first and, as it turned out, the easiest problem to solve. Thanks to the Debian-based architecture of Cumulus Linux, I was able to build a complete container image with just a few lines:
FROM debian:buster

COPY data/packages packages
COPY data/sources.list /etc/apt/sources.list
COPY data/trusted.gpg /etc/apt/trusted.gpg
RUN apt install --allow-downgrades -y $(cat packages)
I extracted the list of installed packages and public APT repos from an existing Cumulus VX VM, copied them into a base debian:buster image and ran apt install – that’s how easy it was. Obviously, the actual Dockerfile ended up being a lot longer, but the main work is done in just these 5 lines. The rest of the steps are just setting up the required 3rd party packages and implement various workarounds and hacks. Below is a simplified view of the resulting Cumulus image:
Once the image is built, it can be run with just a single command. Note the presence of the privileged flag, which is the easiest way to run systemd and provide NET_ADMIN and other capabilities required by Cumulus daemons:
docker run -d --name cumulus --privileged networkop/cx:latest
A few seconds later, the entire Cumulus software stack is fully initialised and ready for action. Users can either start an interactive session or run ad-hoc commands to communicate with Cumulus daemons:
$ docker exec cumulus net show system
Hostname......... 5b870d5c3d31
Build............ Cumulus Linux 4.3.0
Uptime........... 13 days, 5:03:30.690000

Model............ Cumulus VX
Memory........... 12GB
Disk............. 256GB
Vendor Name...... Cumulus Networks
Part Number...... 4.3.0
Base MAC Address. 02:42:C0:A8:DF:02
Serial Number.... 02:42:C0:A8:DF:02
Product Name..... Containerised VX
All this seemed pretty cool but I still had doubts over the functionality of Cumulus dataplane on a general-purpose kernel. Most of the traditional networking vendors do not rely on native kernel dataplane and heavily modify or bypass it completely in order to implement all of the required NOS features. My secret hope was that Cumulus, being the Linux-native NOS, would somehow make it work with just a standard set of kernel features. The only way to find this out was to test.
Building a test lab
I’ve decided that the best way to test is to re-implement the Cumulus Test Drive environment to make use of Ansible playbooks that come with it. Here’s a short snippet of containerlab’s topology definition matching the CTD’s topology:
name: cldemo2-mini

topology:
  nodes:
    leaf01:
      kind: linux
      image: networkop/cx:4.3.0
    leaf02:
      kind: linux
      image: networkop/cx:4.3.0
...

  links:
    - endpoints: ["leaf01:swp1", "server01:eth1"]
    - endpoints: ["leaf01:swp2", "server02:eth1"]
    - endpoints: ["leaf01:swp3", "server03:eth1"]
    - endpoints: ["leaf02:swp1", "server01:eth2"]
    - endpoints: ["leaf02:swp2", "server02:eth2"]
    - endpoints: ["leaf02:swp3", "server03:eth2"]
    - endpoints: ["leaf01:swp49", "leaf02:swp49"]
    - endpoints: ["leaf01:swp50", "leaf02:swp50"]
The entire lab can be spun up with a single command in under 20 seconds (on a 10th gen i7 in WSL2):
$ sudo containerlab deploy -t cldemo2.yaml
At the end of the deploy action, containerlab generates an Ansible inventory file which, with a few minor modifications, can be re-used for the Cumulus Ansible modules. At this stage, I was able to test any of the 4 available EVPN-based designs, swap them around with just a few commands and it all had taken me just a few hours to build. This is where my luck has run out…
The Trough of Disillusionment
The first few topologies I’d spun up and tested worked pretty well out of the box, however I did notice that my fans were spinning like crazy. Upon further examination, I had noticed that the clagd (MLAG daemon) and neighmgrd (ARP watchdog) were intermittently fighting to take over all available CPU threads while nothing was showing up in the logs. That’s when I decided to have a look at the peerlink, thankfully it was super easy to do ip netns exec FOO tcpdump from my WSL2 VM. When I saw hundreds of lines flying on my screen in the next few seconds, I realised it was a L2 loop (it turned out all of the packets were ARP).
At this point, it is worth mentioning that one of the hacks/workarounds I had to implement when building the image was stubbing out the mstpd (it wasn’t able to take over the bridge’s STP control plane). At first, I didn’t think too much of it – kernel was still running CSTP and the speed of convergence wasn’t that big of an issue for me. However, as I was digging deeper, I realised that clagd must be communicating with mstpd in order to control the state of the peerlink VLAN interfaces (traffic is never forwarded over the peerlink under normal conditions). That fact alone meant that neither the standard kernel STP implementation nor upstream mstpd would ever be able to cooperate with clagd – there’s no standard for MLAG (although I suspect most implementations are written by the same set of people). My heart sank, at this stage I was ready to give up and admit that there’s no way that one of the most widely deployed features (MLAG) would work inside a container.
It turned out that CL’s version of
mstpdis different from the one upstream and relies on a custombridgekernel module in order to function properly.
However, there was one way to make Cumulus Linux work in a containerised environment and that would be to run it over a native Cumulus Kernel which, as I discovered later, was very heavily patched. So, in theory, I could run tests on a beefy Cumulus VX VM with all services but docker turned off but that would be a big ask and not a nice UX I was hoping for…
Slope of Enlightenment
This is when I thought about the Firecracker – the lightweight VM manager released by AWS to run Lambda and Fargate services (originally based on the work of the Chromium OS team). I’d started looking at the potential candidates for FC VM orchestration and got very excited when I saw both firecracker-containerd and kata-containers support multiple network interface with tc redirect, the same technology that’s used by containerlab to run vrnetlab-based images.
However, both of these candidates relied on virtio VM Sockets as the communication channel with a VM, which just happened to be one of the features disabled in Cumulus Linux kernel. So the next option I looked at was Weavework’s Ignite and, to my surprise, it worked! I was able to boot the same container image using ignite CLI instead of Docker:
sudo ignite run --runtime docker --name test --kernel-image networkop/kernel networkop/cx
The kernel image is built from two layers borrowed from an existing Cumulus VX VM – an uncompressed kernel image and the entire /lib/modules directory containing loadable kernel modules. The resulting image layer stack looked like this:
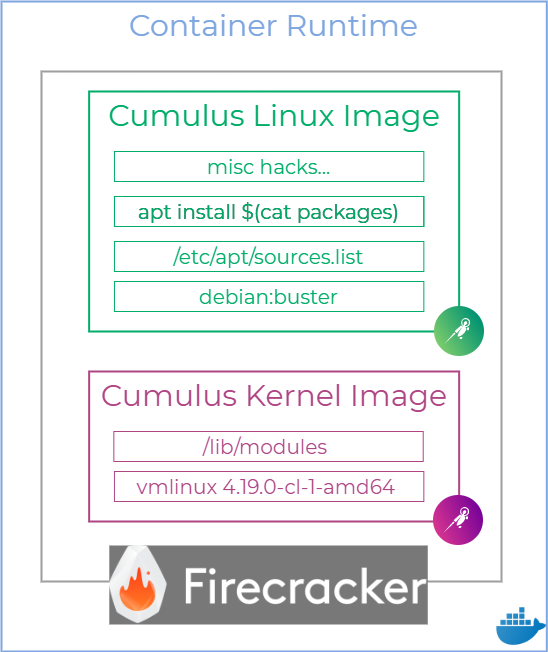
Finally, I was able to test and confirm that all of the worked-around features that didn’t work in a pure container environment worked with ignite. This was a promising first step but there were still a number of key features missing in both containerlab and ignite that needed to be addressed next:
- In order to gracefully introduce ignite, containerlab’s code had to be refactored to support multiple container runtimes [DONE]
- In order to support custom interface naming, containerlab had to control the assignment of interface MAC addresses [DONE]
- Ignite needed to be extended to support multiple interfaces and stitch them with tc redirect [PR is merged]
- A new
igniteruntime needs to be added to containerlab [DONE]
One obvious question could be – is any of this worth the effort? Personally, I had learned so much in the process that my ROI has made it well worth it. For others, I have tried to summarise some of the main reasons why anyone would use containerised Firecracker VMs vs traditional qemu-based VMs in the table below:
| Feature | Legacy VMs | Ignite VMs |
|---|---|---|
| UX | Complex – Vagrant, Libvirt | Simple – containerlab, ignite |
| API | Legacy, QMP | Modern, OpenAPI |
| Images | Multiple formats, mutable | OCI-standard, immutable |
| Startup configuration | Ansible, interactive | Mounting files from host OS |
| Distribution | Individual file sharing | Container registries |
| Startup time | Tens of seconds | Seconds |
| Scale-out | Complex and static | Standard and dynamic |
In addition to this, Firecracker’s official website provides a list of benefits and FAQ covering some of the differences with QEMU.
Plateau of Productivity
Although the final stage is still a fair way out, the good news is that I have a stable working prototype that can reliably build Cumulus-based labs so, hopefully, it’s only a matter of time before all of the PRs get merged and this functionality becomes available upstream. I also hope this work demonstrates the possibility for other NOSs to ship their virtualised versions as OCI images bundled together with their custom kernels.
In the meantime, if you’re interested, feel free to reach out to me and I’ll try to help you get started using containerised Cumulus Linux both on a single node with containerlab and, potentially, even use it for large-scale simulations on top of Kubernetes.
July Updates
Although it took me a lot longer than I anticipated, I’ve managed to merge all of my changes upstream:
- Ignite now supports connecting arbitrary number of extra interfaces defined in VM’s annotations. This opens up possibilities beyond the original network simulation use case, allowing Firecracker micro-VMs to transparently interconnect with any interfaces on the host (e.g. via SR-IOV CNI).
- Containerlab release 0.15 now includes a special
cvxnode that spins up a containerised Cumulus Linux which can be integrated with any number of the supported nodes for multi-vendor labs and interop testing. I’ve also included a number of labs with different configurations covering everything from the basics of Cumulus Linux operation (CTD) all the way to advanced scenarios like symmetric EVPN with MLAG and MLAG-free multi-homing.