UnetLab Installation
Since UNL is a separate project with its own evolving documentation I won’t try to reproduce it in my blog and I’ll simply refer all my readers to UNL download page, UNL installation instructions and UNL first boot configuration.
At the time of writing UNL is distributed as an image packaged in Open Virtualization Format. I’m using VMWare Workstation as a type-2 hypervisor to import and run this image. Check with the UNL how-to page for the list of currently supported hypervisors.
I’ll be using Cisco IOU as a network device emulator in my topologies. Similarly, you can find IOU installation instructions on UNL website. The rest of this post assumes you’ve got UNL up and running and you can successfully create, start and connect to an IOU device by navigating through native GUI interface.
Installing Python and Dependencies
For development purposes I’ll be using Python 2.7. You’ll need to install a package management system pip to gain access to requests library that we’ll be using to talk HTTP to our REST server. To install requests or any other package using pip on a Windows machine, you can use the following command:
python -m pip install requests
PyCharm and Github integration
There’s a plethora of IDEs available for Python. My personal choice is PyCharm - an open-source IDE with built-in debugger, syntax checker, code completion and GIT integration. Here is how you setup PyCharm to work with Github:
- Create a new repository on Github.
- In PyCharm navigate to
VCS -> Checkout from Version Control -> Github, paste in the link to a newly created repository and clickClone. This will create a clone of an empty code repository on your local machine. From now on you’ll see two VCS buttons in PyCharm toolbar to pull and push code to Github. - Add newly created files and directories to git by right-clicking on them and selecting
Git -> Add - At the end of your work push the code to Github by clicking the green VCS button, write your comment in
Commit messagewindow, enter your Github username inAuthorfield and selectCommit and Push. - To get the latest version of code from Github click the blue VCS button to pull changes to local directory.
Just remember that your Github repository is your source of truth and you need to push changes to it every time you finish work and pull code from it every time you restart it. It makes sense even if you work alone since it creates a good habit which may come very useful in the future.
For additional information about git workflow and working with Github you can check out (no pun intended) Github help and Github guides.
Project Skeleton
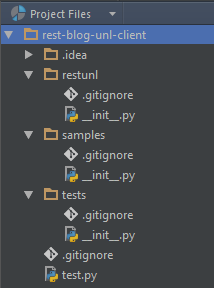
Now that we’ve fully integrated with Github we can setup our basic directory structure. In project Navigation Bar under the project’s main directory create 3 subdirectories:
restunl- to store all code implementing REST SDK logicsamples- to store sample applicationstests- to store test cases for REST SDK
Next we need to tell git which files we DON’T want to track. To do that add filename patterns to .gitignore file and put this file into every directory. Rule of thumb is to only track your code and not your auxiliary files like compiled python code (.pyc), PyCharm settings (.idea) or local git files (.git).
.idea
.git
*.pyc
Finally, in order to be able to import code between different directories within the project, we need to add an empty __init__.py file to each non-root directory which tells Python to treat that directory as a package. The final version of skeleton will look like this:
Before you REST
Here are a few things you need to know about the REST server before you start working with it:
- IP address and Port - the same IP address you use to access UNL from your web browser (in my case it’s 192.168.247.20:80)
- Username and password for authentication - default UNL credentials (admin/unl)
- REST API documentation - in our case it’ll be UnetLab API documentation
Using REST for the first time
Let’s try to query the status of our UnetLab server. According UNL documentation the correct request should look like this:
curl -s -c /tmp/cookie -b /tmp/cookie -X GET -H 'Content-type: application/json' http://127.0.0.1/api/status
Take note of the HTTP method (GET) and URL (http://ip_address/api/status), we’ll use these values in our test program. Disregard the cookies and Content-type headers for now, we’ll get back to them in the future posts. In our project’s root directory create a test.py file with the following code:
import requests
import json

url = 'http://192.168.247.20/api/status'
method = 'GET'
response = requests.request(method, url)
payload = json.loads(response.content)
print payload['code']
This code calls .request method of requests library and passes in an HTTP method type and the URL. The value returned by this call would be an HTTP response. Since payload is encoded as JSON we need to parse the content of the HTTP response (response.content) by calling a .loads method of json library. Once parsed, we can work with any part of JSON payload same way we would with a Python dictionary. If you’ve done everything right, the result of the last print statement should be 200. Feel free to experiment and print, for example, the current version of UNL. Refer to API documentation for the exact structure of the payload.
Conclusion
Now that we’ve setup our development environment we’ll move on to the actual REST SDK development in the next post. Don’t forget to add all your newly created files and directories to git and push them to Github.
All code from this post can be found in my public repository on Github