Extracting Node’s UUID
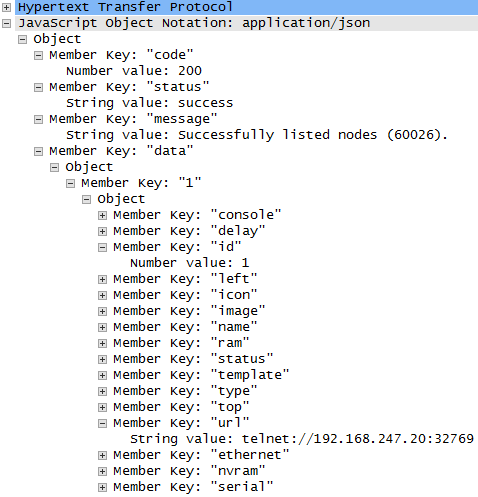
In the previous post we have learned how to create a Node. To perform further actions on it we need to know it’s UUID. According to HTTP specification 201 - Created response SHOULD return a Location header with resource URI, which would contain resource UUID. However, UNetLab’s implementation does not return a Location header so we need to extract that information ourselves. To do that we’ll use the previously defined .get_nodes() method which returns all attributes of all configured Nodes in the following format:

The best place to extract UUID would be when Node is being created. After the Create request has been sent to a server we’ll send another Read request and extract all attributes of a Node based on its name.
class UnlNode(object):

    def __init__(self, lab, device):
    	...
        self.node = self._get_node()
        self.id = self.node['id']
        self.url = self.node['url']

    def _get_node(self):
        nodes = self.lab.get_nodes().json()['data']
        return get_obj_by_name(nodes, self.device.name)
To extract data from the payload we need to call .json() on the returned HTTP response and look for the data key inside that JSON object. The returned value will contain all attributes including the UUID and access URL which we’ll use later. To help us find a Node object matching a name we’ll use a helper function defined below:
def get_obj_by_name(objects, name):
    for obj_id in objects:
        if objects[obj_id]["name"] == name:
            return objects[obj_id]
    return None
Needless to say that we MUST have unique names for all nodes otherwise it won’t be possible to do the matching. It’s quite a safe assumption to make in most cases however no built-in error checking will be performed by the REST SDK to prevent you from doing it.
UnlNet implementation
Before we start connecting Nodes together we need to create a Network. As per the design, UnlNet will be a class holding a pointer to the UnlLab object which created it. The structure of the class will be very similar to UnlNode.
REST_SCHEMA = {
				... ,
				'create_net': '/labs/{lab_name}/networks',
				'get_nets': '/labs/{lab_name}/networks'
			}

class UnlLab(object):
	...
	def create_net(self, name):
        return UnlNet(self, name)

    def get_nets(self):
        api_call = REST_SCHEMA['get_nets']
        api_url = api_call.format(api_call, lab_name=append_unl(self.name))
        resp = self.unl.get_object(api_url)
        return resp


class UnlNet(object):

    def __init__(self, lab, name):
        api_call = REST_SCHEMA['create_net']
        self.unl, self.lab, self.name = lab.unl, lab, name
        payload = {'type': 'bridge', 'name': self.name}
        api_url = api_call.format(api_call, lab_name=append_unl(self.lab.name))
        self.resp = self.unl.add_object(api_url, data=payload)
        self.net = self._get_net()
        self.id = self.net['id']

    def _get_net(self):
        nets = self.lab.get_nets().json()['data']
        return get_obj_by_name(nets, self.name)
Connecting Nodes to a network
Official Unetlab API guide is still under development and doesn’t specify how to connect a Node to a network. If you want to find out the syntax for this or any other unspecified API call you can always try that in a Web GUI while capturing traffic with Wireshark. That is how I’ve discovered that to connect a Node to a network we need to send an Update request with payload containing mapping between Node’s interface ID and Network ID.
REST_SCHEMA = {
                ... ,
                'connect_interface': '/labs/{lab_name}/nodes/{node_id}/interfaces'
            }

class UnlNode(object):
    ...

    def connect_interface(self, intf_name, net):
        api_call = REST_SCHEMA['connect_interface']
        api_url = api_call.format(api_call, lab_name=append_unl(self.lab.name), node_id=self.id)
        payload = {get_intf_id(intf_name): net.id}
        resp = self.unl.update_object(api_url, data=payload)
        return resp
The ID of an interface “Ethernet x/y” of an IOU device can be easily calculated based on the formula id = x + (y * 16) as described here. This will be accomplished with yet another helper function:
def get_intf_id(intf_name):
    x, y = re.findall('\d+', intf_name)
    return int(x) + (int(y) * 16)
Connecting Nodes to each other
To create multi-access topologies we would need to maintain an internal mapping between Node’s interface and the network it’s attached to. However, if we assume that all links are point-to-point, we can not only simplify our implementation but also enable REST client to ignore the notion of a network all together. We’ll simply assume that when device A connects to B our implementation will create a network called A_B in the background and connect both devices to it. This method will perform two separate REST calls and thus will return both responses in a tuple:
class UnlNode(object):
    ...

def connect_node(self, local_intf, other_node, other_intf):
    net = self.lab.create_net(name='_'.join([self.device.name, other_node.device.name]))
    resp1 = self.connect_interface(local_intf, net)
    resp2 = other_node.connect_interface(other_intf, net)
    return resp1, resp2
Assuming all links are point-to-point certainly decreases visibility of created networks and we would not be able to perform selective changes on them in the future. However it is a safe assumption to make for 99% of the networks that I’m dealing with.
Node Start, Stop and Delete
These simple actions can easily be coded using TDD. I will omit the actual implementation and simply provide unit tests for readers to exercise their TDD skills again.
class AdvancedUnlNodeTest(UnlTests):

    def setUp(self):
        super(AdvancedUnlNodeTest, self).setUp()
        self.device_one = Router('R1')
        self.device_two = Router('R2')
        self.lab = self.unl.create_lab(LAB_NAME)
        self.node_one = self.lab.create_node(self.device_one)
        self.node_two = self.lab.create_node(self.device_two)

    def tearDown(self):
        self.unl.delete_lab(LAB_NAME)
        super(AdvancedUnlNodeTest, self).tearDown()

    def test_start_nodes(self):
        self.lab.stop_all_nodes()
        resp = self.lab.start_all_nodes()
        self.assertEqual(200, resp.status_code)

    def test_stop_nodes(self):
        self.lab.start_all_nodes()
        resp = self.lab.stop_all_nodes()
        self.assertEqual(200, resp.status_code)

    def test_delete_node(self):
        resp = self.lab.delete_node(self.node_one.id)
        self.assertEqual(200, resp.status_code)

    def test_del_all_nodes(self):
        self.lab.del_all_nodes()
        resp = self.lab.get_nodes()
        self.assertEqual(0, len(resp_2.json()['data']))

    def test_lab_cleanup(self):
        resp_1 = self.lab.stop_all_nodes()
        self.lab.del_all_nodes()
        resp_2 = self.lab.get_nodes()
        self.assertEqual(200, resp_1.status_code)
        self.assertEqual(0, len(resp_2.json()['data']))
The final, lab_cleanup() method is simply a shortcut to stop_nodes() followed by del_all_nodes().
As always, link to full code is available at the end of this post.
Pushing configuration to Nodes
At this point of time UnetLab does not support configuration import so we’re stuck with the only access method available - telnet. To push configuration into the Node we’re gonna have to establish a telnet session to Node’s URI (which we’ve extracted earlier) and write all configuration into that session.
class UnlNode(object):
    ...

    def configure(self, text):
        return self.device.send_config(wrap_conf(text))
Another helper function wrap_conf() prepends enable and appends end to make configuration suitable for pasting into the new IOU device.
class Router(Device):
    ...

    def send_config(self, config):
        session = telnetlib.Telnet(self.url_ip, self.url_port)
        send_and_wait(session, '\r\n')
        result = send_and_wait(session, config)
        session.close()
        return result
The biggest problem is that Nodes, when started, take some time to boot before we can access the CLI prompt. To overcome that I had to implement a dirty hack in a form of send_and_wait() helper function that simulates pressing the Enter button every 0.1 second until it sees a CLI prompt (either > or #).
def send_and_wait(session, text):
        session.read_very_eager()
        result = ''
        session.write(text)
        while not any(stop_char in result[-3:] for stop_char in ['>', '#']):
            session.write('\r\n')
            result += session.read_very_eager()
            time.sleep(0.1)
        return result
Let’s hope that UNL team will implement config import soon so that we can get rid of this kludgy workaround.
Extending our sample app
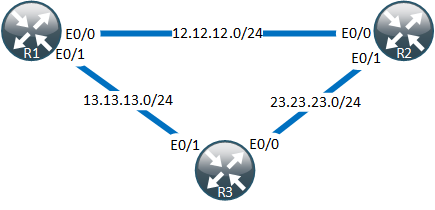
At this stage we’ve got all the code to finish our sample app. The goal is to create and configure the following 3-node topology:

We’ll assume that all configs will be stored as text files under the ./config directory and will have device names as their filename. A helper function read_file will read the contents of a configuration text file into a Python string.
TOPOLOGY = {('R1', 'Ethernet0/0'): ('R2', 'Ethernet0/0'),
            ('R2', 'Ethernet0/1'): ('R3', 'Ethernet0/0'),
            ('R1', 'Ethernet0/1'): ('R3', 'Ethernet0/1')}

def app_1():
    ...
    try:
        # Creating topology in UnetLab
        nodes = dict()
        for (a_name, a_intf), (b_name, b_intf) in TOPOLOGY.iteritems():
            # Create a mapping between a Node's name and an object
            if not a_name in nodes:
                nodes[a_name] = lab.create_node(Router(a_name))
                print("*** NODE {} CREATED".format(a_name))
            if not b_name in nodes:
                nodes[b_name] = lab.create_node(Router(b_name))
                print("*** NODE {} CREATED".format(b_name))
            # Extract Node objects using their names and connect them
            node_a = nodes[a_name]
            node_b = nodes[b_name]
            node_a.connect_node(a_intf, node_b, b_intf)
            print("*** NODES {0} and {1} ARE CONNECTED".format(a_name, b_name))
        print("*** TOPOLOGY IS BUILT")
        lab.start_all_nodes()
        print("*** NODES STARTED")
        # Reading and pushing configuration
        for node_name in nodes:
            conf = read_file('..\\config\\{}.txt'.format(node_name))
            nodes[node_name].configure(conf)
            print("*** NODE {} CONFIGURED".format(node_name))
        raw_input('PRESS ANY KEY TO STOP THE LAB')
    except Exception as e:
        print("*** APP FAILED : {}".format(e))
    finally:
        print("*** CLEANING UP THE LAB")
        lab.cleanup()
        unl.delete_lab(LAB_NAME)
When you run this app for the first time, the lab with 3 nodes will be spun up and configured. When you get to the PRESS ANY KEY prompt you can login into Web GUI and navigate to lab test_1 and validate that all configs have been pushed and devices can ping each other’s loopbacks.
Source code
All code from this post can be found in my public repository on Github