Hardly any conversation about network automation that happens these days can avoid the topic of automation frameworks. Amongst the few that are still actively developed, Ansible is by far the most popular choice. Ansible ecosystem has been growing rapidly over the last few years, with modules being contributed by both internal (Redhat) and external (community) developers. Having the backing of one of the largest open-source first companies has allowed Ansible to spread into all areas of infrastructure – from server automation to cloud provisioning. By following the principle of eating your own dog food, Redhat used Ansible in a lot of its own open-source projects, which made it even more popular in the masses. Another important factor in Ansible’s success is the ease of understanding. When it comes to network automation, Ansible’s stateless and agentless architecture very closely follows a standard network operation experience – SSH in, enter commands line-by-line, catch any errors, save and disconnect. But like many complex software projects, Ansible is not without its own challenges, and in this post, I’ll take a look at what they are and how CUE can help overcome them.
Ansible Automation Workflow
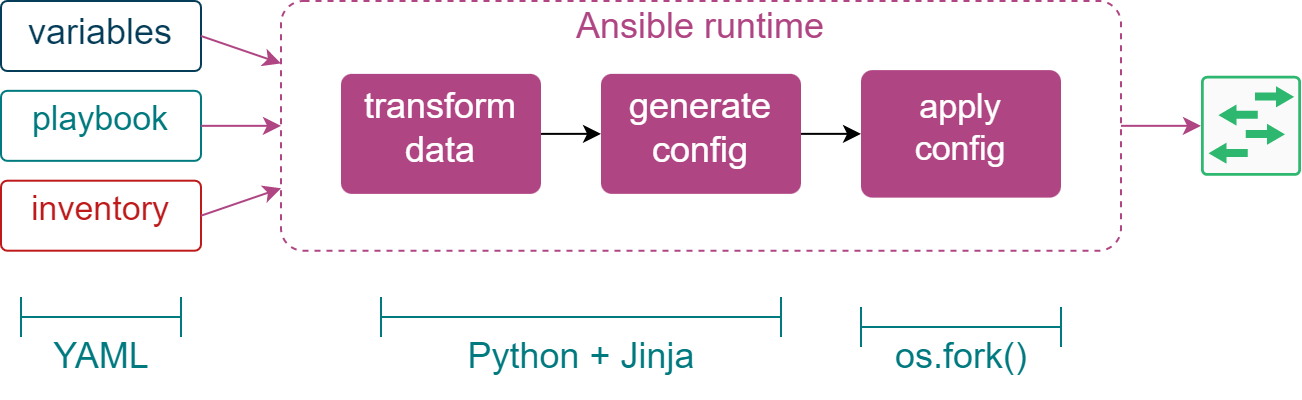
Let’s start with an overview of the intermediate Ansible automation workflow, that was described in the previous post, and try to see what areas are more prone to human error or may require additional improvement. In order to do that, I’ll break it down into a sequence of steps describing how configuration data travels through this automation workflow, where it gets mutated and how it is used:
- A user creates a playbook, a device inventory and a set of variables describing the desired state of the network.
- Ansible runtime parses all input data and calculates a per-host set of variables.
- This set of high-level variables gets transformed into a larger set of low-level variables.
- The entire set of variables is now passed to a config generation module which combines them with one or more Jinja templates.
- The resulting semi-structured text is applied to the running device configuration.
One of the first places where we can make a mistake is the input data. Specifically, a set of input variables is essentially a free-form YAML data structure with values sourced from up to 22 different places. There’s no way to verify that the shape of the input data structure is correct and the only way to validate the type of values is by using filters.
However, even with filters, you can never be sure the returned value has the right type, as filters are built to “fail safe”. For example, the ansible.utils.ipaddr filter will return the input value (as a string) if it’s a valid IP address, but will return a boolean False if it isn’t, conflating the returned value and an error in a single variable. There’s no way to abort Ansible execution or signal to the user that the input value was incorrect unless you use assert statements, which become pretty ineffective even with relatively small volumes of data.
The next place where things can go wrong is the data transformation stage. This can be anything from a simple builtin.set_fact module with a bunch of filters to what I describe as “Jinja programming” – manipulating data structures using Jinja’s expression statements (e.g. set and do tags) or even building a structured document (YAML, JSON) using string interpolation. In any case, the likelihood of making a mistake gets even higher since both the input data and the transformation logic itself are dynamically-typed and Jinja is notorious for becoming incomprehensible very quickly.
Now we’re at the config generation phase where, once again, the input variables are passed without validation which means you can easily get tripped by one of the YAML idiosyncrasies and troubleshooting Jinja templating errors is particularly painful as errors are often reported with a vague “undefined variable” message.
Finally, one of the unlikely places that can benefit from CUE is the API interactions with remote devices. CUE’s scripting capabilities can orchestrate interaction with multiple HTTP-based APIs and, if possible, would do this concurrently. This not only accelerates execution but also reduces resource utilisation thanks to the CUE’s (Go’s) lightweight concurrency model compared to Ansible’s more expensive os.fork() approach.
If you go back and look at the first two areas I’ve identified above, you can see that they can easily be done by an external tool and integrated into any existing Ansible workflow without making any serious changes to how the config is generated or delivered. These will be the two things I’m going to cover in this post.
The final two areas are more disruptive but may allow you to replace Ansible completely for pretty much any non-SSH API automation, i.e. JSON-RPC or REST APIs. I’ll cover them in the following article.
Input Data Validation
If you’re thinking about giving CUE a try and now sure where to start, input data validation could be your best option. Creating a schema for input data is a good exercise to test and explore the language while having no negative impact on your automation workflow. The benefits, however, are worth it as the schema will improve your automation workflow by:
- Validating the structural shape of input variables to catch any potential indentation errors
- Making sure all variables have the right type and catch any typos before you run the playbook
This could also be a good place to introduce additional constraints for values, for example, to verify that BGP ASN is within a valid range or if IP addresses are valid. In general, once you’ve started with a simple schema, you can continue mixing in more policies to tighten the range of allowed values and improve the overall data integrity.
Let’s see a concrete example of how to develop a CUE schema to validate input variables using Cumulus’s golden turtle Ansible modules. Get yourself a copy of this repository:
git clone https://gitlab.com/cumulus-consulting/goldenturtle/cumulus_ansible_modules.git && cd cumulus_ansible_modules
You’ll find several validated network topologies inside of the inventories/ directory together with a set of input variables spread across standard Ansible group and host variable directories. To make this example a bit simpler, I’ll focus on the bonds (link aggregation) configuration, and the following example shows a snippet of the bonds variable from the group_vars/leaf/common.yml file:
bonds:
  - name: bond1
    ports: [swp1]
    clag_id: 1
    bridge:
      access: 10
    options:
      mtu: 9000
      extras:
        - bond-lacp-bypass-allow yes
        - mstpctl-bpduguard yes
        - mstpctl-portadminedge yes
I’ve picked this example deliberately because it contains many places where we can make a mistake, but also because it can be very succinctly summarized by the following CUE schema:
#bonds: [...{
    name: string
    ports: [...string]
    clag_id: int
    bridge: access: int
    options: {
        mtu: int & <9999
        extras: [...string]
    }
}]

bonds: #bonds
Here we’ve created a CUE definition that describes the structure and type of values expected in the bonds variable. The last line “applies” the #bonds schema to any existing bonds variable. Assuming the above schema is saved in the bonds.cue file, we can check if the input variables conform to it with the following command:
$ cue vet bonds.cue inventories/evpn_symmetric/group_vars/leaf/common.yml
Now let’s introduce a mistake by changing the value of MTU in the input variable. The resulting error message tells us exactly where the error is and why it’s not valid:
$ sed -i 's/mtu: 9000/mtu: 90000/' inventories/evpn_symmetric/group_vars/leaf/common.yml
$ cue vet bonds.cue inventories/evpn_symmetric/group_vars/leaf/common.yml
bonds.0.options.mtu: invalid value 900000 (out of bound <9999):
    ./bonds.cue:8:20
    ./inventories/evpn_symmetric/group_vars/leaf/common.yml:27:13
You can experiment a bit more by changing the values in the input data, for example, try changing ports to an empty list or left-shifting the indentation of access: 10 line.
Creating schemas for every input variable can be a tedious process. However, there’s a shortcut you can take that can get you a working schema relatively easily. It’s a two-step process:
- Use one of the open-source code generators to produce (infer) a JSON Schema from a YAML, JSON or a Jinja template document
- Convert JSON Schema to CUE using the
cue importcommand.
To make it easier to follow, I’ve run through the original bonds variable through an online converter, saved the result in a schema.json file, and imported it using the cue import -f -p schema schema.json command. The resulting schema.cue file contained the following:
bonds: [...#Bond]

#Bond: {
        name: string
        ports: [...string]
        clag_id: int
        bridge:  #Bridge
        options: #Options
}

#Bridge: access: int

#Options: {
        mtu: int
        extras: [...string]
}
Although it’s a slightly different (more verbose) version of my hand-written CUE schema, most of the values are exactly the same. The only bits that are missing are constraints and policies, which are optional and can be added at a later stage. You can find another example of the above process on the Jinja to CUE page of my cue-ansible repo.
Once you have your schemas developed, you can start adding them to an existing Ansible workflow. Here are some ideas of how this can be done, starting from the easiest one:
- You can add an extra task to the top of your Ansible playbook that uses
shellmodule to executecue vetagainst input variables. - If you have an existing CI system, you can add the
cue vetas a new step beforeansible-playbookcommand is executed. - Another option is to create a custom module that can be configured to run CUE schema validation for any schema or input variables.
The last option requires you to write an Ansible module in Go, but it allows you to have a native way of providing inputs and consuming outputs:
- name: Validate input data model with CUE
  cue_validate:
    schema: "schemas/input.cue"
    input: "{{ hostvars[inventory_hostname] | string | b64encode }}"
  delegate_to: localhost
You can find a reference implementation of this module with an example workflow in the Validation page of my cue-ansible repo.
Data Transformation
At this point, we’ve only used CUE for schema validation. The next logical step is to ingest all input values in CUE and start working with them as native CUE values. There are many benefits to using CUE for value management, and I’ll cover some of them in the following blog posts, but for now, let me focus on a very common task of data transformation.
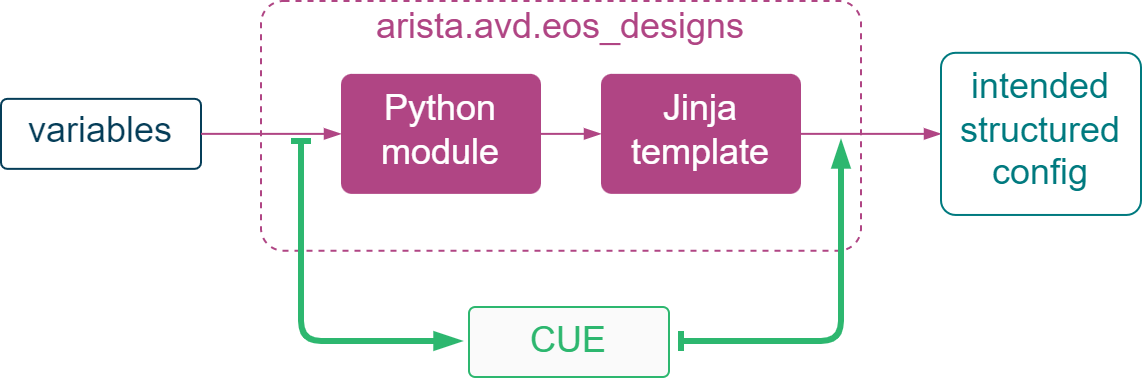
For demonstration purposes, I’ll be using Arista’s Validated Design (AVD) as it’s one of the most interesting examples of data transformation done in Ansible. AVD uses a combination of custom Python modules and Jinja templates to transform high-level input data and generate structured configs that have all the values required by devices. My goal would be to demonstrate CUE’s data transformation capabilities by removing parts of Ansible code and Jinja templates and replacing them with CUE code, while keeping both inputs and outputs unchanged.
Let’s start by cloning the AVD repo and pinning the Ansible collection path to that directory.
$ git clone https://github.com/aristanetworks/ansible-avd.git && cd ansible-avd
$ export ANSIBLE_COLLECTIONS_PATH=$(pwd)
$ export OUT_DIR=intended/structured_configs
Using one of the included example topologies, I run through the entire data transformation stage shown in the above diagram, first without using CUE.
$ cd ansible_collections/arista/avd/examples/l2ls-fabric
$ ansible-playbook build.yml  --tags build,facts,debug
In the ./intended/structured_configs directory, I now have a set of structured device configs and input host variables. Next, I’m going to do two things:
- Import all input host variables to allow me to use them natively as CUE values.
- Save the generated structured device configuration of
LEAF1switch as a baseline for future comparison (I’m running it throughcue eval --out=yamlsimply to update the indentation).
$ cue import -p hostvars -f $OUT_DIR/LEAF1-debug-vars.yml
$ mv $OUT_DIR/LEAF1-debug-vars.cue leaf1.cue
$ cue eval $OUT_DIR/LEAF1.yml --out=yaml > $OUT_DIR/LEAF1.base.yml
In order to keep the input values separate from the data transformation logic, I’ve moved them into their own hostvars package using the -p flag in the command above. CUE’s code organisation practices are very similar to Go’s (programming language) and allow me to group code into packages and group similar packages into modules. In order to import the hostvars package, I first need to initialise a CUE module:
cue mod init arista.avd
Now I can create a new file called transform.cue and get access to all input variables using the arista.avd:hostvars import statement. From here on, I can use a standard set of data manipulation techniques like the for loop, string interpolation, variable declarations and conditionals to expand the high-level data model into a low-level structured configuration, focusing only on port channel interfaces for this example:
package avd

import (
	"arista.avd:hostvars"
	"strconv"
)

// Uplink port channels
port_channel_interfaces: {
	for link in hostvars.switch.uplinks if link.channel_group_id != _|_ {
		let groupID = strconv.Atoi(link.channel_group_id)

		"Port-Channel\(groupID)": {
			description: link.channel_description + "_Po\(groupID)"
			type:        "switched"
			shutdown:    false
			if link.vlans != _|_ {
				vlans: link.vlans
			}
			mode: "trunk"
			if hostvars.switch.mlag != _|_ {
				mlag: groupID
			}
		}
	}
}

// MLAG port channels
if hostvars.switch.mlag != _|_ {
    port_channel_interfaces: {
        let groupID = strconv.Atoi(hostvars.switch.mlag_port_channel_id)

        "Port-Channel\(groupID)": {
            description: "MLAG_PEER_" + hostvars.switch.mlag_peer + "_Po\(groupID)"
            type: "switched"
            shutdown: false,
            vlans: hostvars.switch.mlag_peer_link_allowed_vlans
            mode: "trunk",
            trunk_groups: ["MLAG"]
        }
    }
}
The
if value != _|_expression in the above example is a check if a value is defined, where_|_is a special “bottom” or error value.
The example above contains enough data transformation logic to generate the required set of port-channel interfaces, and can be checked as follows:
$ cue eval transform.cue
port_channel_interfaces: {
    "Port-Channel47": {
        description: "MLAG_PEER_LEAF2_Po47"
        type:        "switched"
        shutdown:    false
        vlans:       "2-4094"
        mode:        "trunk"
        trunk_groups: ["MLAG"]
    }
    "Port-Channel1": {
        description: "SPINES_Po1"
        type:        "switched"
        shutdown:    false
        vlans:       "10,20"
        mlag:        1
        mode:        "trunk"
    }
}
Now let’s remove the port channel data generation logic from AVD’s Python module and completely wipe out a corresponding Jinja template:
$ sed -i '/port_channel_interface_name: port_channel_interface,/d' ../../roles/eos_designs/python_modules/mlag/__init__.py
$ cat /dev/null > ../../roles/eos_designs/templates/underlay/interfaces/port-channel-interfaces.j2
I re-run the playbook again to see what results I get after the above changes:
$ ansible-playbook build.yml  --tags build,facts,debug
$ cue eval $OUT_DIR/LEAF1.yml --out=yaml > $OUT_DIR/LEAF1.new.yml
The resulting structured config should contain no port channel configuration data, which I verify by comparing with the baseline:
$ diff $OUT_DIR/LEAF1.new.yml $OUT_DIR/LEAF1.base.yml
67c67,82
< port_channel_interfaces: {}
---
> port_channel_interfaces:
>   Port-Channel47:
>     description: MLAG_PEER_LEAF2_Po47
>     type: switched
>     shutdown: false
>     vlans: "2-4094"
>     mode: trunk
>     trunk_groups:
>       - MLAG
>   Port-Channel1:
>     description: SPINES_Po1
>     type: switched
>     shutdown: false
>     vlans: 10,20
>     mode: trunk
>     mlag: 1
However, since I already have the correct port channel data produced by my CUE code, I can merge it with the latest structured config. Note that I pass both CUE and YAML files as the input to the cue eval command, leaving it up to CUE to recognise the type, import and evaluate everything as a single set of CUE values.
$ cue eval transform.cue $OUT_DIR/LEAF1.yml --out=yaml > $OUT_DIR/LEAF1.new.yml
Re-running the earlier diff command should show that the new structured device config looks exactly the same as the baseline (with a minor exception of struct field re-ordering). This means I have generated the same exact output from the same set of inputs, bypassing Python and Jinja and moving all port-channel data transformation logic into CUE. This way I have consolidated and unified data transformation and made it easier to read and reason about.
Now that I’ve covered the first two stages of the advanced automation workflow, it’s time to move on to the final two stages and wrap up the Ansible portion of this blog post series. In the next post, I’ll show how to hierarchically organise CUE code to minimise boilerplate, how to work with externally-sourced data like IPAM or secret stores and use CUE’s scripting to apply configurations to multiple devices at the same time.