Now that I’m finally beginning to settle down at my new place of residence I can start spending more time on research and blogging. I have left off right before I was about to start exploring the native OpenStack distributed virtual routing function. However as I’d started rebuilding my OpenStack lab from scratch I realised that I was doing a lot of repetitive tasks which can be easily automated. Couple that with the fact that I needed to learn Chef for my new work and you’ve got this blogpost describing a few Chef cookbooks (similar to Ansible’s playbook) automating all those manual steps described in my earlier blogposts 1 and 2.
In addition to that in this post I’ll show how to build a very simple OpenStack baremetal provisioner and installer. Some examples of production-grade baremetal provisioners are Ironic, Crowbar and MAAS. In our case we’ll turn UNetLab VM into an undercloud, a server used to provision and deploy our OpenStack lab, an overcloud. To do that we’ll first install and configure DHCP, TFTP and Apache servers to PXE-boot our UNL OpenStack nodes. Once all the nodes are bootstrapped, we’ll use Chef to configure the server networking and kickoff the packstack OpenStack installer.
In this post I’ll try to use Chef recipes that I’ve written as much as possible, therefore you won’t see the actual configuration commands, e.g. how to configure Apache or DHCP servers. However I will try to describe everything that happens at each step and hopefully that will provide enough incentive for the curious to look into the Chef code and see how it’s done. To help with the Chef code understanding let me start with a brief overview of what to look for in a cookbook.
How to read a Chef cookbook (Optional)
A cookbook directory (/cookbooks/[cookbook_name]) contains all its configuration scripts in /recipes. Each file inside a recipe contains a list of steps to be performed on a server. Each step is an operation (add/delete/update) on a resource. Here are some of the common Chef resources:
- Package - allows you to add, remove or update a package
- Template - creates a file from an erb-formatted template
- Execute - runs an ad-hoc CLI command
Just these three basic resources allow you to do 95% of administrative tasks on any server. Most importantly they do it in platform-independent (any flavour of Linux) and idempotent (only make changes if current state is different from a desired state) way. Other directories you might want to explore are:
- /templates - contains all the erb-formatted templates
- /attributes - contains recipe variables (file paths, urls etc.)
- /files - contains the non-template files, i.e. files with static content
Bootstrapping the OpenStack nodes
If you haven’t done it yet, download a copy of the UNetLab VM from the official website. Set it up inside your hypervisor so that you can access Internet through the first interface pnet0 (i.e. connect the first NIC of the VM to hypervisor’s NAT interface). Make sure the VM has got at least 6GB of RAM and VT-x support enabled for nested virtualization.
Follow the official installation instructions to install Chef Development Kit inside UNetLab VM.
wget https://packages.chef.io/stable/ubuntu/12.04/chefdk_0.16.28-1_amd64.deb
dpkg -i chefdk_0.16.28-1_amd64.deb
Install git and clone chef cookbooks.
apt-get -y update
apt-get -y install git
git clone https://github.com/networkop/chef-unl-os.git
cd chef-unl-os
Examine the lab environment settings to see what values are going to be used. You can modify that file to your liking.
Note that the OpenStack node IDs (keys of os_lab hash) MUST have one to one correspondence with the UNL node IDs which will be created at step 5
cat environment/lab.rbRun Chef against a local server to setup the baremetal provisioner. This step installs and configures DHCP, TFTP and Apache servers. It also creates all the necessary PXE-boot and kickstart files based on our environment settings. Note that a part of the process is the download of a 700MB CentOS image so it might take a while to complete.
chef-client -z -E lab -o pxeAt the start of the PXE-boot process, DCHP server sends an OFFER which, along with the standard IP information, includes the name of the PXE boot image and the IP address of TFTP server where to get it from. A server loads this image and then searches the TFTP server for the boot configuration file which tells it what kernel to load and where to get a kickstart file. Both kickstart and the actual installation files are accessed via HTTP and served by the same Apache server that runs UNL GUI.
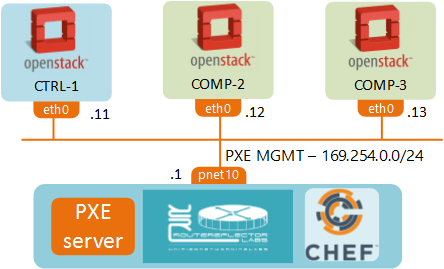
From UNL GUI create a new lab, add 3 OpenStack nodes and connect them all to pnet10 interface as described in this guide. Note that the pnet10 interface has already been created by Chef so you don’t have to re-create it again.
Make sure that the UNL node IDs match the ones defined in the environment setting file
Fire-up the nodes and watch them being bootstrapped by our UNL VM.
Server provisioning
Next step is to configure the server networking and kickoff the OpenStack installer. These steps will also be done with a single command:
chef-client -z -E lab lab.rb
The first part of this script will connect to each prospective OpenStack node and setup its network interfaces and hostnames. The second part of this script will generate a packstack answer file and modify its settings to exclude some of the components we’re not going to use (like Nagios, Ceph and Ceilometer). Have a look at cookbooks/packstack/recipe/default.rb for the list of modifications. The final step is a command to kickoff the packstack installer which will use another configuration management system, Puppet, to install and configure OpenStack according to the provided answer file.
At the end of these steps you should have a fully functional 3-node OpenStack environment.
To be continued…
This is a part of a 2-post series. In the next post we’ll look into how to use the same tools to perform the baremetal provisioning of our physical underlay network.