What I’ve covered in the previous blog post about CUE and Ansible were isolated use cases, disconnected islands in the sea of network automation. The idea behind that was to simplify the introduction of CUE into existing network automation workflows. However, this does not mean CUE is limited to those use cases and, in fact, CUE is most powerful when it’s used end-to-end — both to generate device configurations and to orchestrate interactions with external systems. In this post, I’m going to demonstrate how to use CUE for advanced network automation workflows involving fetching information from an external device inventory management system, using it to build complex hierarchical configuration values and, finally, generating and pushing intended configurations to remote network devices.
CUE vs CUE scripting
CUE was designed to be a simple, scalable and robust configuration language. This is why it includes type checking, schema and constraints validation as first-class constructs. There are some design decisions, like the lack of inheritance or value overrides, that may take new users by surprise, however over time it becomes clear that they make the language simpler and more readable. One of the most interesting features of CUE, though, is that all code is hermetic. What that means is all configuration values must come from local CUE files and cannot be dynamically fetched or injected into the evaluation process, so that no matter how many times or in which environment you run your CUE code, it always produces the same result.
However, as we all know, in real life configuration values may come from many different places. In the network automation context, we often use IP address and infrastructure management systems (IPAM/DCIM) to store device-specific data, often referring to these systems as a “source of truth”. I won’t focus on the fact that most often these systems are managed imperatively (point and click), making them a very poor choice for this task (how do you roll back?), but their dominance and popularity in our industry are undeniable. So how can we make CUE work in such environments?
CUE has an optional scripting layer, that is complementary to the core functionality of a configuration language. The CUE scripting (or tooling) layer works by evaluating files (identified by the _tool.cue suffix) that contain a set of tasks and executing them concurrently. These files are still written in CUE and can access the values defined in the rest of the CUE module, however, CUE tasks are allowed to make local and remote I/O calls and can be strung together to form some pretty complex workflows. As you may have guessed, this is what allows us to interact with external databases and remote network devices.
Advanced Network Automation Workflow
Let’s revisit the advanced network automation workflow, that was described in the CUE introduction post. What makes it different from the intermediate workflow is that host variables are sourced from multiple different places. In most common workflows, these places can be described as:
- Local static variables, defined in host and group variables.
- Variables injected by the environment, which often include sensitive information like secrets and passwords.
- Externally-sourced data, fetched and evaluated during runtime.
Once this data is collected and evaluated, the remainder of the process looks very similar to what I’ve described in the previous blog post, i.e. this data is modified and expanded to generate a complete per-device set of variables which are then used to produce the final device configuration. The top part of the following diagrams is a visual representation of this workflow.
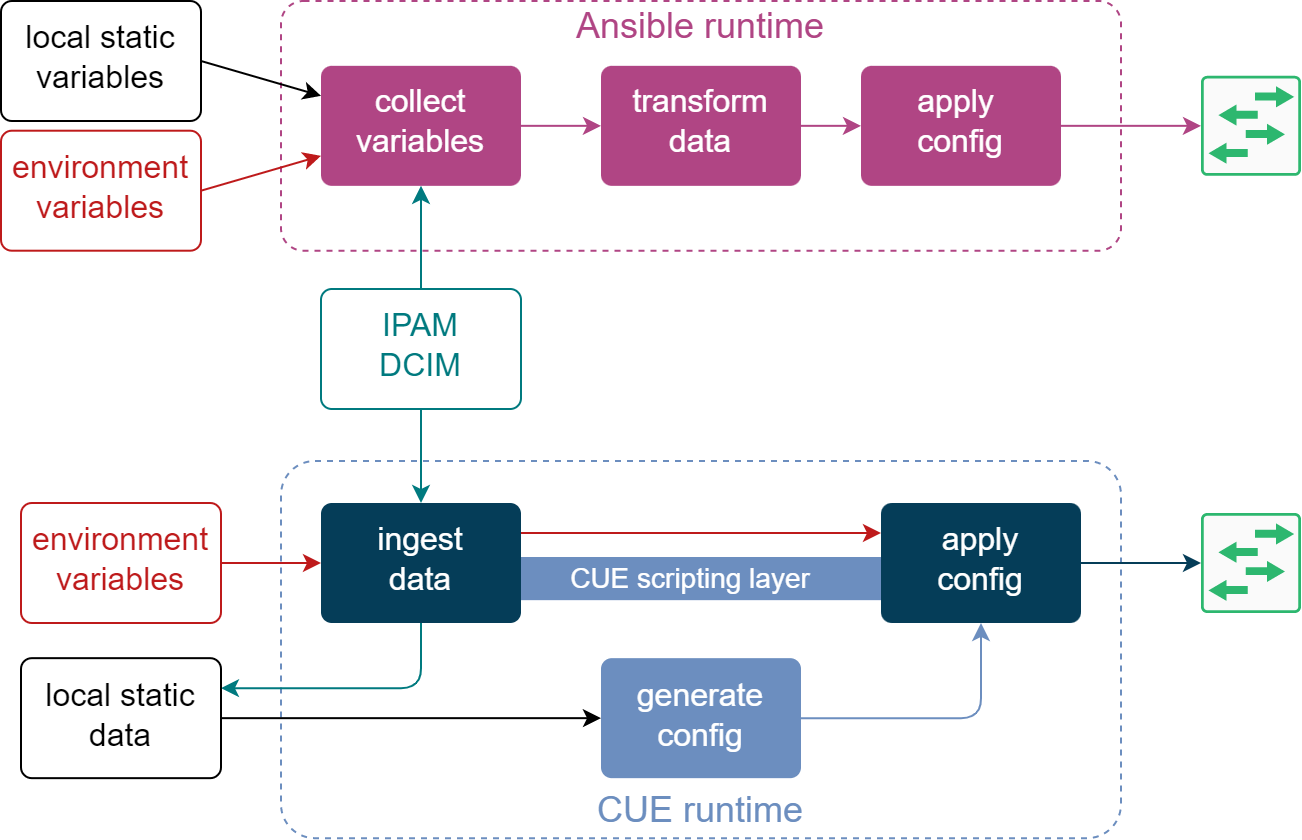
The bottom part shows how the same data sources are consumed in the equivalent CUE workflow. External data from IPAM/DCIM systems is ingested using the CUE scripting layer and saved next to the rest of the CUE values. CUE runtime now takes the latest snapshot of external data, combines it with other local CUE values and generates a set of per-device configurations. At this point, we can either apply them as-is or combine them with Jinja templates to generate a semi-structured text before sending it to the remote device.
In the rest of this blog post, I will cover some of the highlights of the above CUE workflow, while configuring an unnumbered BGP session between Arista cEOS and NVIDIA Cumulus Linux connected back-to-back. The goal is to show an example of how the data flows from its source all the way to its ultimate destination and how CUE can be used at every step of the way.
All code from this blog post can be found in the cue-networking-II github repository
Pulling Configuration Data from External Systems
For an external IPAM/DCIM system I’ll be using the public demo instance of Nautobot located at demo.nautbot.com. Since this is a demo instance, it gets rebuilt periodically, so I need to pre-populate it with the required device data. This is done based on the static inventory file and automated with the cue apply ./... command. The action of populating IPAM/DCIM systems with data is normally a day 0 exercise and is rarely included in day 1+ network automation workflows, so I won’t focus on it here. However, if you’re interested in an advanced REST API workflow orchestrated by CUE, you can check out the seed_tool.cue file for more details.
Once we have the right data in Nautobot, we can fetch it by orchestrating a number of REST API calls with CUE. However, since Nautobot supports GraphQL, I’ll cheat a little bit and get all the data in a single RPC. The query itself is less important, as it’s unique to my specific requirements, so I’ll focus only on the CUE code. In the fetch_tool.cue file I define a sequence of tasks that will get executed concurrently for all devices from the inventory:
- Query the GraphQL API endpoint of Nautobot and unmarshal the response into a CUE struct.
- Import the received data as CUE and save it in a device-specific directory.
All of the above can be done with a single cue fetch ./... command and the following snippet shows how the first task is written in CUE:
import (
	"text/template"
	"tool/http"
	"encoding/json"
)

command: fetch: {
 for _, dev in inventory.#devices {
  (dev.name): {
   gqlRequest: http.Post & {
    url:     inventory.ipam.url + "/graphql/"
    request: inventory.ipam.headers & {
     body: json.Marshal({
      query: template.Execute(gqlQuery.contents, {name: dev.name})
     })
    }
   }

   response: json.Unmarshal(gqlRequest.response.body)

   // save data in a file (omitted for brevity)
  }
 }
}
The above code snippet demonstrates how to make a single HTTP API call and parse the received payload using tool/http and encoding/json packages from the CUE’s standard library. The CUE scripting layer is smart enough to understand dependencies between tasks, e.g. in this case json.Unmarshal will only be called once the gqlRequest has returned a response, while still trying to run tasks concurrently (all GraphQL calls will be made at roughly the same time). This makes it highly efficient at almost no cost to the end user.
Data Transformation
At this point, it would make sense to talk a little about how CUE evaluates files from a hierarchical directory structure. In Ansible, it’s common to use “group” variables to manage settings common amongst multiple hosts. In CUE, you can use subdirectories to group related hosts and manage their common configuration values. Although my two-node test topology is not the best example for this, I still tried to group data based on the device role value extracted from Nautobot. This is what the ./config directory structure looks like. As you can see, host-specific CUE files are sitting in leaf/edge directories, while common data values and operations are defined in their parent directories:

Whenever a CUE script needs to evaluate data from one of these subdirectories (for example ./... tells CUE to evaluate all files recursively starting from the current directory), the values in the leaf subdirectories get merged with everything from their parents. So, for example, the lon-sw-01.cue values will get merged with ./lleaf/groupvars.cue but not with sspine/groupvars.cue, which will get merged with lon-sw-02.cue. This is just an example of how to optimise configuration values to remove boilerplate, you can check out my earlier cue-networking repository for a more complete real-world example.
So now in the leaf CUE files we’ve got the data that was retrieved from Nautobot, saved in a hostvars: [device name]: {} struct. That means in the topmost hostvars.cue file I’ve got access to all of that data and can start adding a schema and even do some initial value computations. You can view the resulting host variables with the cue try ./... command.
$ cue try ./...
-== hostvars[lon-sw-02] ==-
name: lon-sw-02
device_role:
  name: sspine
> snip <
The majority of the work is done in the transform.cue file, where hostvars get transformed into a complete structured device configuration. As I’ve already covered data transformation in the previous blog post, I won’t focus too much on it here, and invite you to walk through the code on your own. However, before moving on, I want to discuss the use of schemas in the data transformation logic, e.g. nvidia.#set in the below code snippet from the transform.cue file:
nvidiaX: {
  _input: {}
  nvidia.#set & {
    interface: {
      for _, intf in _input.interfaces {
        if strings.HasPrefix(intf.name, "loopback") {
          lo: {
            ip: address: (intf.ip_addresses[0].address): {}
            type: "loopback"
// omitted for brevity
Although schemas are optional, they can give you additional assurance that what you’re doing is right and catch errors before you try to use the generated data. Moreover, once CUE gets its own language server, writing the code would become a lot easier with IDE’s help. Similar to Go, you would get features like struct templates, autocompletion and error highlighting.
The biggest problem with using a schema is generating it in the first place. I’ve briefly touched upon this subject in the previous blog post but want to expand a bit on it here. Doesn’t matter if you work with a model-compliant API (OpenAPI or YANG) or with templates that generate a semi-structured set of CLI commands, you can always describe their input with a data model. CUE understands a few common schema languages and can import and generate its own definitions from them. So now all that we need to do is generate that data model somehow.
In some cases, you may be in luck if your vendor already publishes these models, however, this time I’ll focus on how to generate them manually. The detailed step-by-step process is documented in the GitHub repository, but here I want to summarise some of the key points:
- If your device manages its configuration as structured data (the case of NVIDIA Cumulus Linux), you can generate a JSON schema from an existing configuration instance. For example, I’ve worked out the exact set of values I need to configure first, saved it in a YAML file and ran it through YAML to JSON schema converter.
- If you have to use text templates to produce the device config (the case of Arisa EOS), you can infer a JSON schema from a Jinja template (see this script for an example).
- CUE can correctly recognise the JSON schema format and import it as native definitions using the
cue importcommand. - Following the initial (double) conversion, some of the type information may get lost or distorted, so most likely you would need to massage the automatically generated CUE schema before you can use it. This, however, only needs to be done once, since you can discard the intermediate schema files and carry on working exclusively with CUE definitions from now on.
You can view the generated structured device configurations, produced by the data transformation logic, by running the cue show ./... command.
Configuration Push
This is the final stage of the CUE workflow where, once again, I use CUE scripting to interact with Arista’s JSON RPC and NVIDIA’s REST APIs. All that is done as a part of a user-defined cue push ./... command that executes multiple vendor-dependent workflows in per-device coroutines. You can find the complete implementation in the main_tool.cue file, and here I’d like to zoom in on a few interesting concepts.
The first one is authentication and secret management. As I’ve mentioned before, one of the common ways of injecting secrets is via environment variables, e.g. if you running a workflow inside a CI/CD system. While CUE cannot inject them natively, you can achieve the same result using the @tag keyword. A common pattern is to define default values that can be overridden with a user-provided command line tag, like in the following snippet from the inventory.cue file:
auth: {
  nvidia: {
    user:     *"cumulus" | string @tag(nvidia_user)
    password: *"cumulus" | string @tag(nvidia_pwd)
  }
  arista: {
    user:     *"admin" | string @tag(arista_user)
    password: *"admin" | string @tag(arista_pwd)
  }
}
When calling any CUE script, you can now pass an additional -t tag_name=tag_value flag that will get injected into your code. For example, this is how I would change the default password for Arista:
export ARISTA_PWD=foo
cue push -t arista_pwd=$ARISTA_PWD ./...
Another interesting concept is the function pattern. It’s an ability to abstract a reusable piece of CUE code in a dedicated struct that can be evaluated when needed by any number of callers. I’ve used this pattern multiple times in most of the _tool.cue files, but below I’ll cover its simplest form.
Before we can send the generated configuration to Arista eAPI endpoint, we need to wrap it with a few special keywords – enable, configure and write. This is done in a special struct called eapi_wrapper. This struct defines an abstract schema for its input (a list of strings) but performs some concrete actions on it (wraps it in special keywords). In order to “call” this “function” we unify it with a struct that we know will define these inputs as concrete values. CUE runtime will delay the evaluation of this function struct until all of its inputs are known. In the following example, once CUE generates a list of CLI commands in the split_commands list, it will evaluate the “function call” expression and the result will become available to subsequent tasks in wrapped_commands.output.
eapi_wrapper: {
  input: [...string]
  output: ["enable", "configure"] + input + ["write"]
}

command: push: {
  for _, dev in inventory.#devices {
    (dev.name): {
      // ...
      wrapped_commands: eapi_wrapper & {input: split_commands}
      // ...
    }
  }
}
The last concept I wanted to cover is the sequencing of tasks in CUE scripts. As I’ve mentioned before, CUE runtime is able to infer the implicit dependencies between tasks and evaluate them in the right order. This happens when an input of one task consumes an output from another task. This way you can just focus on writing code, while CUE will do its best to parallelise as many tasks as it can.
However, some tasks don’t have implicit dependencies but still need to be run in sequence. A good example of this is the interaction with NVIDIA’s NVUE API. The procedure to apply the generated configuration consists of 3 stages – (1) creating a new configuration revision, (2) patching this revision with the generated data and (3) applying it. While 1-2 and 1-3 have implicit dependencies (revision ID generated in 1), stages 2 and 3 don’t, but 3 must always happen after 2. The way we can make it happen is by adding $after to the third task, referencing the name of the second. This little trick allows CUE to build the right graph of dependencies and apply the revision only after it has been patched.
createRevision: http.Post & {
  url: "https://\(dev.name):8765/nvue_v1/revision"
  // ...
}

patchRevision: http.Do & {
  method: "PATCH"
  url:    "https://\(dev.name):8765/nvue_v1/?rev=\(escapedID)"
  // ...
}

applyRevision: http.Do & {
  $after: patchRevision
  method: "PATCH"
  url:    "https://\(dev.name):8765/nvue_v1/revision/\(escapedID)"
  // ...
}
You can see the complete example of the last two concepts in the main_tool.cue file and a few more advanced workflows in seed_tool.cue.
Outro
You can test the complete CUE workflow in a virtual environment with the help of containerlab:
- Build the lab with
cue lab-up ./... - Pre-seed the demo Nautobot instance with
cue apply ./... - Import the data from Nautobot with
cue fetch ./... - Push the generated device configs with
cue push ./...
You can verify that everything works as intended by pinging the peer device’s loopback, e.g. docker exec lon-sw-01 ping 198.51.100.2. More importantly, at this stage, we have managed to replace all functions of Ansible, while having improved the data integrity, added flexibility and made our network automation workflow more robust.
Another interesting bonus of using CUE, when compared to Ansible, is the reduced resource utilisation. Due to a completely different architecture, CUE consumes a lot fewer resources and works much faster than Ansible, while doing essentially the same work. I’ve done some measurements of how CUE compares to Ansible when doing remote machine execution (running commands via SSH) and making remote API calls and in both cases CUE outperforms Ansible across major dimensions. In the most extreme case (CUE API vs Ansible API), CUE is more than 3 times faster and consumes less than 8% of the memory required by Ansible. You can find this and other results in the cue-ansible repository.
I think at this point I’ve covered all that I wanted about CUE and how it can be used for common network automation workflows. My hope is that people can see that there is a better alternative to what we use today and keep an open mind when making their next decision.
If you feel like this is something unfamiliar and strange, remember that Ansible and Python all used to feel like that at some point in the past. If you have the desire to do things better and learn new things, then CUE can offer a lot in both departments.
P.S. I still have enough material for another blog post about CUE and YANG. I haven’t finished exploring this topic so it may be a very small article, depending on how it goes. Stay tuned for more.