In the previous post, we’ve examined the foundation of the Network-as-a-Service platform. A couple of services were used to build the configuration from data models and templates and push it to network devices using Nornir and Napalm. In this post, we’ll focus on the user-facing part of the platform. I’ll show how to expose a part of the device data model via a custom API built on top of Kubernetes and how to tie it together with the rest of the platform components.
Interacting with a Kubernetes API
There are two main ways to interact with a Kubernetes API: one using a client library, which is how NaaS services communicate with K8s internally, the other way is with a command line tool called kubectl, which is intended to be used by humans. In either case, each API request is expected to contain at least the following fields:
- apiVersion - all API resources are grouped and versioned to allow multiple versions of the same kind to co-exist at the same time.
- kind - defines the type of object to be created.
- metadata - collection of request attributes like name, namespaces, labels etc.
- spec - the actual payload of the request containing the attributes of the requested object.
In order to describe these fields in a concise and human-readable way, API requests are often written in YAML, which is why you’ll see a lot of YAML snippets throughout this post. You can treat each one of those snippets as a separate API call that can be applied to a K8s cluster using a kubectl apply command.
Designing a Network Interface API
The structure and logic behind any user-facing API can be very customer-specific. Although the use-case I’m focusing on here is a very simple one, my goal is to demonstrate the idea which, if necessary, can be adapted to other needs and requirements. So let’s assume we want to allow end users to change access ports configuration of multiple devices and this is how a sample API request may look like:
apiVersion: network.as.a.service/v1
kind: Interface
metadata:
  name: request-001
  namespace: tenant-a
spec:
  services:
    - devicename: deviceA
      ports: ["1", "15"]
      vlan: 10
      trunk: yes
    - devicename: deviceB
      ports: ["1","10", "11"]
      vlan: 110
      trunk: no
There are a few things to note in the above request:
- Every request will have a unique name per namespace (tenant).
- The main payload inside the
.specproperty is a list of (VLAN) network services that need to be configured on network devices. - Each element of the list contains the name of the device, list of ports and a VLAN number to be associated with them.
Now let’s see what it takes to make Kubernetes “understand” this API.
Introducing Kubernetes CRDs
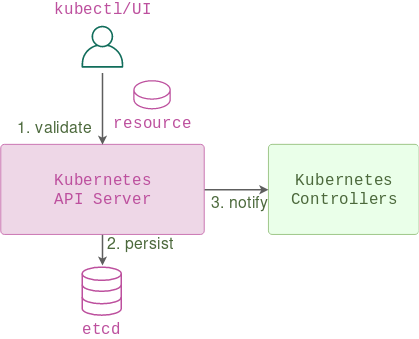
API server is the main component of the control plane of a Kubernetes cluster. It receives all incoming requests, validates them, notifies the respective controllers and stores them in a database.
Apart from the APIs exposing a set of standard resources, there’s an ability to define custom resources - user-defined data structures that an API server can accept and store. Custom resources are the main building blocks for a lot of platforms built on top of K8s and at the very least they allow users to store and retrieve some arbitrary YAML data.
In order to be able to create a custom resource, we need to define it with a custom resource definition (CRD) object that would describe the name of the resource, the api group it belongs to and, optionally, the structure and values of the YAML data via OpenAPI v3 schema. This is how a CRD for the above Interface API would look like:
apiVersion: apiextensions.k8s.io/v1beta1
kind: CustomResourceDefinition
metadata:
  name: interfaces.network.as.a.service
spec:
  group: network.as.a.service
  versions:
  - name: v1
    served: true
    storage: true
  scope: Namespaced
  subresources:
    status: {}
  names:
    plural: interfaces
    singular: interface
    kind: Interface
    shortNames:
    - intf
  validation:
    openAPIV3Schema:
      required: ["spec"]
      properties:
        spec:
          required: ["services"]
          properties:
            services:
              type: array
              items:
                type: object
                required: ["devicename", "vlan", "ports"]
                properties:
                  devicename:
                    type: string
                  vlan:
                    type: integer
                    minimum: 1
                    maximum: 4094
                  ports:
                    type: array
                    items:
                      type: string
                  trunk:
                    type: boolean
As soon as we kubectl apply the above YAML, our API server will expose the Interface API for all external users to perform standard CRUD operations on, and store the results alongside other K8s resources in etcd datastore.
Kubernetes custom controllers
Custom resources, by themselves, do not provide any way to define a business logic of what to do with their data. This job is normally performed by Kubernetes controllers that “watch” events that happen to these resources and perform actions based on that. This tandem between custom controllers and CRDs is so common, it led to the creation of an operator pattern and a whole slew of operator frameworks with languages ranging from Go to Ansible.
However, as I’ve mentioned in the previous post, sometimes using a framework does not give you any benefit and after having looked at some of the most popular ones, I’ve decided to settle on my own implementation which turned out to be a lot easier. In essence, all that’s required from a custom controller is to:
- Subscribe to events about a custom resource (via K8s API).
- Once an event is received, perform the necessary business logic.
- Update the resource status if required.
Let’s see how these custom controllers are implemented inside the NaaS platform.
NaaS controller architecture
NaaS platform has a special watcher service that implements all custom controller logic. Its main purpose is to process incoming Interface API events and generate a device-centric interface data model based on them.
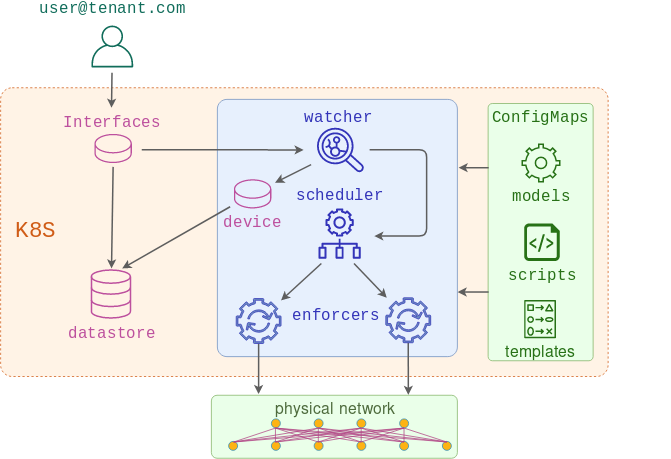
Internally, the watcher service is built out of two distinct controllers:
- interface-watcher - listens to
InterfaceAPI events and updates a customDeviceresource that stores an aggregated device-centric view of all interface API requests received up to date. Once all the changes have been made, it updates the status of the request and notifies the scheduler about all the devices affected by this event. - device-watcher - listens to
DeviceAPI events and generates configmaps containing a device interface data model. These configmaps are then consumed by enforcers to build the access interface part of the total device configuration.
Interface-watcher architecture
The main loop of the interface-watcher receives Interface API events as they arrive and processes each network service individually:
for network_service in event_object["spec"]["services"]:
    results.append(
        process_service(event_metadata, network_service, action, defaults)
    )
For each service, depending on the type of the event, we either add, update or delete ports from the global device-centric model:
device = get_or_create_device(device_name, defaults)
device_data = device["spec"]
if action == "ADDED":
    device_data = add_ports(
        network_service, device_data, resource_name, resource_namespace
    )
elif action == "DELETED":
    device_data = delete_ports(network_service, device_data, resource_name)
elif action == "MODIFIED":
    device_data = delete_all_ports(device_data, resource_name)
    device_data = add_ports(
        network_service, device_data, resource_name, resource_namespace
    )
For each of the added ports, we copy all settings from the original request and annotate it with metadata about its current owner and tenant:
ports = origin.pop("ports")
for port in ports:
    destination[port] = dict()
    destination[port] = origin
    destination[port]["annotations"] = annotate(owner, namespace)
This results in the following custom Device resource being created from the original Interface API request:
apiVersion: network.as.a.service/v1
kind: Device
metadata:
  name: devicea
  namespace: default
spec:
  "1":
    annotations:
      namespace: tenant-a
      owner: request-001
      timestamp: "2019-06-19 22:09:02"
    trunk: true
    vlan: 10
  "15":
    annotations:
      namespace: tenant-a
      owner: request-001
      timestamp: "2019-06-19 22:09:02"
    trunk: true
    vlan: 10
As subsequent requests can add or overwrite port ownership information, metadata allows the controller to be selective about which ports to modify in order to not accidentally delete ports assigned to a different owner:
new_destination = copy.deepcopy(destination)
for port in origin["ports"]:
    if (port in destination) and (
        destination[port].get("annotations", {}).get("owner", "") == owner
    ):
        log.debug(f"Removing port {port} from structured config")
        new_destination.pop(port, None)
Once the event has been processed, interface-watcher updates the device resource with the new values:
device["spec"] = device_data
update_device(device_name, device, defaults)
The last command triggers a MODIFIED event on the Device CR and this is where the next controller kicks in.
Device-watcher architecture
The job of a device-watcher is to, first, extract the payload from the above request:
event_object = event["object"]
event_metadata = event_object["metadata"
device_name = event_metadata["name"]
device_data = event_object["spec"]
The payload is then serialised into a string and saved as a configmap with additional pointers to Jinja template and order/priority number to help the enforcer build the full device configuration:
k8s_api = client.CoreV1Api()
body = {
    "metadata": {
        "name": device_name,
        "annotations": {"order": "99", "template": "interface.j2"},
        "labels": {"device": device_name, "app": "naas", "type": "model"},
    },
    "data": {"structured-config": yaml.safe_dump(device_data)},
}

k8s_api.replace_namespaced_config_map(
    device_name, event_metadata["namespace"], body
)
The remaining part of the workflow is similar to what was described in the previous post. The scheduler receives the request with the list of devices to be re-provisioned, spins up the required number of enforcers who collect all relevant data models, combine them with Jinja templates and push the new config.
Demo
This demo will pick up from where the previous one has left off. The assumption is that the test topology, K8s cluster and scheduler/enforcer services are already deployed as described in the previous post. The code for this demo can be downloaded here.
Deploy the watcher service
make watcher-build
The above command performs the following actions:
- Creates two namespaces that will represent different platform tenants
- Creates
InterfaceandDeviceCRD objects describing our custom APIs - Deploys both watcher custom controllers along with the necessary RBAC rules
- Uploads the interface jinja template to be used by enforcers
Test
Issue the first Interface API call:
kubectl apply -f crds/03_cr.yaml
Check the logs of the interface-watcher to make sure it’s picked up the Interface ADDED event:
kubectl logs deploy/interface-watcher
2019-06-20 08:20:01 INFO interface-watcher - interface_watcher: Watching Interface CRDs
2019-06-20 08:20:09 INFO interface-watcher - process_services: Received ADDED event request-001 of Interface kind
2019-06-20 08:20:09 INFO interface-watcher - process_service: Processing ADDED config for Vlans 10 on device devicea
2019-06-20 08:20:09 INFO interface-watcher - get_device: Reading the devicea device resource
Check the logs of the device-watcher to make sure it has detected the Device API event:
kubectl logs deploy/device-watcher
2019-06-20 08:20:09 INFO device-watcher - update_configmaps: Updating ConfigMap for devicea
2019-06-20 08:20:09 INFO device-watcher - update_configmaps: Creating configmap for devicea
2019-06-20 08:20:09 INFO device-watcher - update_configmaps: Configmap devicea does not exist yet. Creating
Check the logs of the scheduler service to see if it has been notified about the change:
kubectl logs deploy/scheduler
2019-06-20 08:20:09 INFO scheduler - webhook: Got incoming request from 10.32.0.4
2019-06-20 08:20:09 INFO scheduler - webhook: Request JSON payload {'devices': ['devicea', 'deviceb']}
2019-06-20 08:20:09 INFO scheduler - create_job: Creating job job-6rlwg0
Check the logs of the enforcer service to see if device configs have been generated and pushed:
kubectl logs jobs/job-6rlwg0
2019-06-20 08:20:18 INFO enforcer - push_configs: Downloading Model configmaps
2019-06-20 08:20:18 INFO enforcer - get_configmaps: Retrieving the list of ConfigMaps matching labels {'app': 'naas', 'type': 'model'}
2019-06-20 08:20:18 INFO enforcer - push_configs: Found models: ['devicea', 'deviceb', 'generic-cm']
2019-06-20 08:20:18 INFO enforcer - push_configs: Downloading Template configmaps
2019-06-20 08:20:18 INFO enforcer - get_configmaps: Retrieving the list of ConfigMaps matching labels {'app': 'naas', 'type': 'template'}
Finally, we can check the result on the device itself:
devicea#sh run int eth1
interface Ethernet1
   description request-001
   switchport trunk allowed vlan 10
   switchport mode trunk
Coming up
What we’ve covered so far is enough for end users to be able to modify access port settings on multiple devices via a standard API. However, there’s still nothing protecting the configuration created by one user from being overwritten by a request coming from a user in a different tenant. In the next post, I’ll show how to validate requests to make sure they do not cross the tenant boundaries. Additionally, I’ll show how to mutate incoming requests to be able to accept interface ranges and inject default values. To top it off, we’ll integrate NaaS with Google’s identity provider via OIDC to allow users to be mapped to different namespaces based on their google alias.