In the previous two posts, we’ve seen how to build a custom network API with Kubernetes CRDs and push the resulting configuration to network devices. In this post, we’ll apply the final touches by enabling oAuth2 authentication and enforcing separation between different tenants. All of these things are done while the API server processes incoming requests, so it would make sense to have a closer look at how it does that first.
Kubernetes request admission pipeline
Every incoming request has to go through several stages before it can get accepted and persisted by the API server. Some of these stages are mandatory (e.g. authentication), while some can be added through webhooks. The following diagram comes from another blogpost that covers each one of these stages in detail:
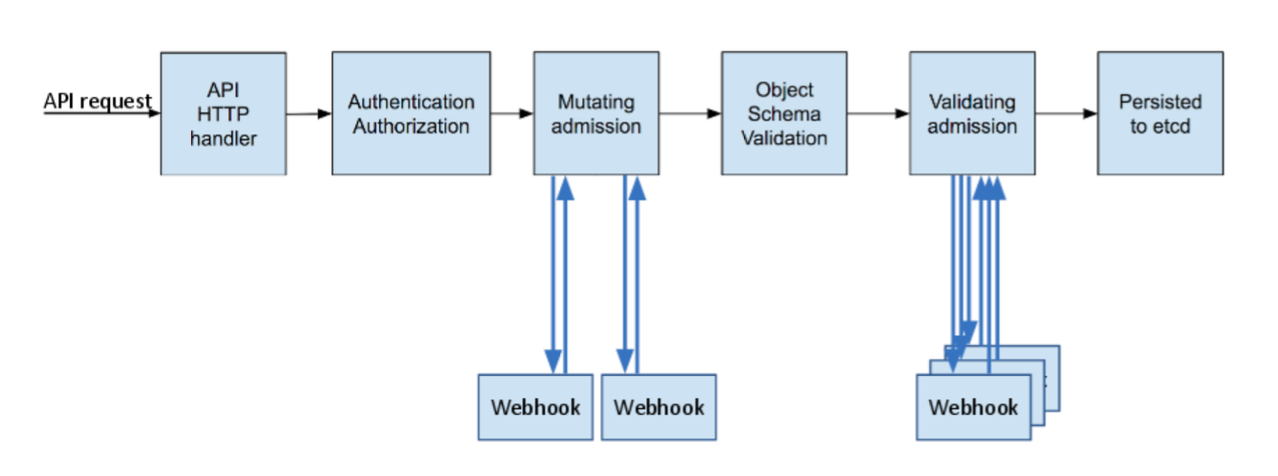
Specifically for NaaS platform, this is how we’ll use the above stages:
- All users will authenticate with Google and get mapped to individual namespace/tenant based on their google alias.
- Mutating webhook will be used to inject default values into each request and allow users to define ranges as well as individual ports.
- Object schema validation will do the syntactic validation of each request.
- Validating webhook will perform the semantic validation to make sure users cannot change ports assigned to a different tenant.
The following sections will cover these stages individually.
Authenticating with Google
Typically, external users are authenticated using X.509 certificates, however, lack of CRL or OCSP support in Kubernetes creates a problem since lost or exposed certs cannot be revoked. One of the alternatives is to use OpenID Connect which works on top of the OAuth 2.0 protocol and is supported by a few very big identity providers like Google, Microsoft and Salesforce. Although OIDC has its own shortcomings (read this blogpost for details), it is still often preferred over X.509.
In order to authenticate users with OIDC, we need to do three things:
- Configure the API server to bind different user aliases to their respective tenants.
- Authenticate with the identity provider and get a signed token.
- Update local credentials to use this token.
The first step is pretty straightforward and can be done with a simple RBAC manifest. The latter two steps can either be done manually or automatically with the help of dexter. NaaS Github repo contains a sample two-liner bash script that uses dexter to authenticate with Google and save the token in the local ~/.kube/config file.
All that’s required from a NaaS administrator is to maintain an up-to-date tenant role bindings and users can authenticate and maintain their tokens independently.
Mutating incoming requests
Mutating webhooks are commonly used to inject additional information (a sidecar proxy for service meshes) or defaults values (default CPU/memory) into incoming requests. Both mutating and validating webhooks get triggered based on a set of rules that match the API group and type of the incoming request. If there’s a match, a webhook gets called by the API server with an HTTP POST request containing the full body of the original request. The NaaS mutating webhook is written in Python/Flask and the first thing it does is extract the payload and its type:
request_info = request.json
modified_spec = copy.deepcopy(request_info)
workload_type = modified_spec["request"]["kind"]["kind"]
Next, we set the default values and normalize ports:
if workload_type == "Interface":
    defaults = get_defaults()
    set_intf_defaults(modified_spec["request"]["object"]["spec"], defaults)
    normalize_ports(modified_spec["request"]["object"]["spec"])
The last function expands interface ranges, i.e. translates 1-5 into 1,2,3,4,5.
for port in ports:
    if not "-" in port:
        result.append(str(port))
    else:
        start, end = port.split("-")
        for num in range(int(start), int(end) + 1):
            result.append(str(num))
Finally, we generate a json patch from the diff between the original and the mutated request, build a response and send it back to the API server.
patch = jsonpatch.JsonPatch.from_diff(
    request_info["request"]["object"], modified_spec["request"]["object"]
)
admission_response = {
    "allowed": True,
    "uid": request_info["request"]["uid"],
    "patch": base64.b64encode(str(patch).encode()).decode(),
    "patchtype": "JSONPatch",
}
return jsonify(admissionReview = {"response": admission_response})
The latest (v1.15) release of Kubernetes has added support for default values to be defined inside the OpenAPI validation schema, making the job of writing mutating webhooks a lot easier.
Validating incoming requests
As we’ve seen in the previous post, it’s possible to use OpenAPI schema to perform syntactic validation of incoming requests, i.e. check the structure and the values of payload variables. This function is very similar to what you can accomplish with a YANG model and, in theory, OpenAPI schema can be converted to YANG and vice versa. However useful, such validation only takes into account a single input and cannot cross-correlate this data with other sources. In our case, the main goal is to protect one tenant’s data from being overwritten by request coming from another tenant. In Kubernetes, semantic validation is commonly done using validating admission webhooks and one of the most interesting tools in this landscape is Open Policy Agent and its policy language called Rego.
Using OPA’s policy language
Rego is a special-purpose DSL with “rich support for traversing nested documents”. What this means is that it can iterate over dictionaries and lists without using traditional for loops. When it encounters an iterable data structure, it will automatically expand it to include all of its possible values. I’m not going to try to explain how opa works in this post, instead I’ll show how to use it to solve our particular problem. Assuming that an incoming request is stored in the input variable and devices contain all custom device resources, this is how a Rego policy would look like:
input.request.kind.kind == "Interface"
new_tenant := input.request.namespace
port := input.request.object.spec.services[i].ports[_]
new_device := input.request.object.spec.services[i].devicename
existing_device_data := devices[_][lower(new_device)].spec
other_tenant := existing_device_data[port].annotations.namespace
not new_tenant == other_tenant
The actual policy contains more than 7 lines but the most important ones are listed above and perform the following sequence of actions:
- Verify that the incoming request is of kind
Interface - Extract its namespace and save it in the
new_tenantvariable - Save all ports in the
portvariable - Remember which device those ports belong to in the
new_devicevariables - Extract existing port allocation information for each one of the above devices
- If any of the ports from the incoming request is found in the existing data, record its owner’s namespace
- Deny the request if the requesting port owner (tenant) is different from the current tenant.
Although Rego may not be that easy to write (or debug), it’s very easy to read, compared to an equivalent implemented in, say, Python, which would have taken x3 the number of lines and contain multiple for loops and conditionals. Like any DSL, it strives to strike a balance between readability and flexibility, while abstracting away less important things like web server request parsing and serialising.
The same functionality can be implemented in any standard web server (e.g. Python+Flask), so using OPA is not a requirement
Demo
This is a complete end-to-end demo of Network-as-a-Service platform and encompasses all the demos from the previous posts. The code for this demo is available here and can be run on any Linux OS with Docker.
0. Prepare for OIDC authentication
For this demo, I’ll only use a single non-admin user. Before you run the rest of the steps, you need to make sure you’ve followed dexter to setup google credentials and update OAuth client and user IDs in kind.yaml, dexter-auth.sh and oidc/manifest.yaml files.
1. Build the test topology
This step assumes you have docker-topo installed and c(vEOS) image built and available in local docker registry.
make topo
This test topology can be any Arista EOS device reachable from the localhost. If using a different test topology, be sure to update the inventory file.
2. Build the Kubernetes cluster
The following step will build a docker-based kind cluster with a single control plane and a single worker node.
make kubernetes
3. Check that the cluster is functional
The following step will build a base docker image and push it to dockerhub. It is assumed that the user has done docker login and has his username saved in the DOCKERHUB_USER environment variable.
export KUBECONFIG="$(kind get kubeconfig-path --name="naas")"
make warmup
kubectl get pod test
This is a 100MB image, so it may take a few minutes for test pod to transition from ContainerCreating to Running
4. Build the NaaS platform
The next command will install and configure both mutating and validating admission webhooks, the watcher and scheduler services and all of the required CRDs and configmaps.
make build
5. Authenticate with Google
Assuming all files from step 0 have been updated correctly, the following command will open a web browser and prompt you to select a google account to authenticate with.
make oidc-build
From now on, you should be able to switch to your google-authenticated user like this:
kubectl config use-context mk
And back to the admin user like this:
kubectl config use-context kubernetes-admin@naas
6. Test
To demonstrate how everything works, I’m going to issue three API requests. The first API request will set up a large range of ports on test switches.
kubectl config use-context mk
kubectl apply -f crds/03_cr.yaml
The second API request will try to re-assign some of these ports to a different tenant and will get denied by the validating controller.
kubectl config use-context kubernetes-admin@naas
kubectl apply -f crds/04_cr.yaml
Error from server (Port 11@deviceA is owned by a different tenant: tenant-a (request request-001), Port 12@deviceA is owned by a different tenant: tenant-a (request request-001),
The third API request will update some of the ports from the original request within the same tenant.
kubectl config use-context mk
kubectl apply -f crds/05_cr.yaml
The following result can be observed on one of the switches:
devicea#sh run int eth2-3
interface Ethernet2
   description request-002
   shutdown
   switchport trunk allowed vlan 100
   switchport mode trunk
   spanning-tree portfast
interface Ethernet3
   description request-001
   shutdown
   switchport trunk allowed vlan 10
   switchport mode trunk
   spanning-tree portfast
Outro
Currently, Network-as-a-Service platform is more of a proof-of-concept of how to expose parts of the device data model for end users to consume in a safe and controllable way. Most of it is built out of standard Kubernetes component and the total amount of Python code is under 1000 lines, while the code itself is pretty linear. I have plans to add more things like an SPA front-end, Git and OpenFaaS integration, however, I don’t want to invest too much time until I get some sense of external interest. So if this is something that you like and think you might want to try, ping me via social media and I’ll try to help get things off the ground.