Cluster API (CAPI) is a relatively new project aimed at deploying Kubernetes clusters using a declarative API (think YAML). The official documentation (a.k.a. the Cluster API book), does a very good job explaining the main concepts and goals of the project. I always find that one of the best ways to explore new technology is to see how it works locally, on my laptop, and Cluster API has a special “Docker” infrastructure provider (CAPD) specifically for that. However, the official documentation for how to setup a docker managed cluster is very poor and fractured. In this post, I’ll try to demonstrate the complete journey to deploy a single CAPI-managed k8s cluster and provide some explanation of what happens behind the scene so that its easier to troubleshoot when things go wrong.
Prerequisites
Two things must be pre-installed before we can start building our test clusters:
- kind - a tool to setup k8s clusters in docker containers, it will be used as a management (a.k.a. bootstrap) cluster.
- clusterctl - a command line tool to interact with the management cluster.
We’re gonna need run a few scripts from the Cluster API Github repo, so let’s get a copy of it locally:
git clone --depth=1 [email protected]:kubernetes-sigs/cluster-api.git && cd cluster-api
When building a management cluster with kind, it’s a good idea to mount the docker.sock file from your host OS into the kind cluster, as it is mentioned in the book. This will allow you to see the CAPD-managed nodes directly in your hostOS as regular docker containers.
cat > kind-cluster-with-extramounts.yaml <<EOF
kind: Cluster
apiVersion: kind.sigs.k8s.io/v1alpha3
nodes:
  - role: control-plane
    extraMounts:
      - hostPath: /var/run/docker.sock
        containerPath: /var/run/docker.sock
EOF
kind create cluster --config ./kind-cluster-with-extramounts.yaml --name clusterapi
kubectl cluster-info --context kind-clusterapi
At this stage you should have your kubectl pointed at the new kind cluster, which can be verified like this:
kubectl get nodes -o wide
NAME                       STATUS   ROLES    AGE   VERSION   INTERNAL-IP   EXTERNAL-IP   OS-IMAGE       KERNEL-VERSION          CONTAINER-RUNTIME
clusterapi-control-plane   Ready    master   66s   v1.17.0   172.17.0.2    <none>        Ubuntu 19.10   5.6.6-200.fc31.x86_64   containerd://1.3.2
Preparing a CAPD controller
The docker image for the CAPD controller is not available in the public registry, so we need to build it locally. The following two commands will build the image and update the installation manifests to use that image.
make -C test/infrastructure/docker docker-build REGISTRY=gcr.io/k8s-staging-capi-docker
make -C test/infrastructure/docker generate-manifests REGISTRY=gcr.io/k8s-staging-capi-docker
Next, we need side-load this image into a kind cluster to make it available to the future CAPD deployment
kind load docker-image --name clusterapi gcr.io/k8s-staging-capi-docker/capd-manager-amd64:dev
Setting up a Docker provider
Once again, following the book, we need to run a local override script to generate a set of manifests for Docker provider:
cat > clusterctl-settings.json <<EOF
{
  "providers": ["cluster-api","bootstrap-kubeadm","control-plane-kubeadm", "infrastructure-docker"]
}
EOF
cmd/clusterctl/hack/local-overrides.py
You should be able to see the generated manifests at ~/..cluster-api/overrides/infrastructure-docker/latest/infrastructure-components.yaml, the only last thing we need to do is let clusterctl know where to find them:
cat > ~/.cluster-api/clusterctl.yaml <<EOF
providers:
  - name: docker
    url: $HOME/.cluster-api/overrides/infrastructure-docker/latest/infrastructure-components.yaml
    type: InfrastructureProvider
EOF
Finally, we can use the clusterctl init command printed by the local-verrides.py script to create all CAPI and CAPD components inside our kind cluster:
clusterctl init --core cluster-api:v0.3.0 --bootstrap kubeadm:v0.3.0 --control-plane kubeadm:v0.3.0 --infrastructure docker:v0.3.0
At this stage, we should see the following deployments created and ready (1/1).
k get deploy -A | grep cap
capd-system                         capd-controller-manager                         1/1
capi-kubeadm-bootstrap-system       capi-kubeadm-bootstrap-controller-manager       1/1
capi-kubeadm-control-plane-system   capi-kubeadm-control-plane-controller-manager   1/1
capi-system                         capi-controller-manager                         1/1
capi-webhook-system                 capi-controller-manager                         1/1
capi-webhook-system                 capi-kubeadm-bootstrap-controller-manager       1/1
capi-webhook-system                 capi-kubeadm-control-plane-controller-manager   1/1
If capd-system deployment is not READY and stuck trying to pull the image, make sure that the capd-controller-manager deployment is using the image that was generated in the previous section.
Generating a CAPD-managed cluster manifest
All the instructions provided so far can also be found in the official documentation. However, at this stage, the book started having big gaps that were not trivial to figure out. TLDR: you can just run the below command to generate a sample capd cluster manifest and move on to the next section. However if you ever need to modify this command, check out my notes below it.
DOCKER_POD_CIDRS="192.168.0.0/16" \
DOCKER_SERVICE_CIDRS="10.128.0.0/12" \
DOCKER_SERVICE_DOMAIN="cluster.local" \
clusterctl config cluster capd --kubernetes-version v1.17.5 \
--from ./test/e2e/data/infrastructure-docker/cluster-template.yaml \
--target-namespace default \
--control-plane-machine-count=1 \
--worker-machine-count=1 \
> capd.yaml
At the time of writing, CAPD used kindest/node docker images (see defaultImageName in test/infrastructure/docker/docker/machines.go) and combined it with a tag provided in the --kubernetes-version argument. Be sure to always check if there’s a matching tag on dockerhub. If it is missing (e.g. v1.17.3), Machine controller will fail to create a docker container for your kubernetes cluster and you’ll only see the load-balancer container being created.
Another issue is the clusterctl may not find the cluster-template.yaml where it expects, so it would have to be provided with the --from argument. This template would require additional variables (all that start with DOCKER_) that have to be provided for it to be rendered. These can be modified as long as you understand what they do.
Note: never set the POD CIDR equal to the Service CIDR unless you want to spend your time troubleshooting networking and DNS issues.
Finally, you should also make sure that the target namespace is specified explicitly, otherwise the generated manifest will contain an incorrect combination of namespaces and will get rejected by the validating webhook.
Creating a CAPD-managed cluster
The final step is to apply the generated manifest and let the k8s controllers do their job.
kubectl apply -f capd.yaml
It’s worth spending a bit of time understanding what’s some of these controllers do. The DockerCluster controller is responsible for the creation of a load-balancing container (capd-lb). A load-balancer is needed to provide a single API endpoint in front of multiple controller nodes. It’s built on top of the HAProxy image (kindest/haproxy:2.1.1-alpine), and does the healthchecking and load-balancing across all cluster controller nodes. It’s worth noting that the DockerCluster resource is marked as READY as soon as the controller can read the IP assigned to the capd-lb container, which doesn’t necessarily reflect that the cluster itself is built.
Typically, all nodes in a CAPI-managed clusters are bootstrapped with cloud-init that is generated by the bootstrap controller. However Docker doesn’t have a cloud-init equivalent, so the DockerMachine controller simply executes each line of the bootstrap script using the docker exec commands. It’s also worth noting that containers themselves are also managed using docker CLI and not API.
Installing CNI and MetalLB
As a bonus, I’ll show how to install CNI and MetalLB to build a completely functional k8s cluster. First, we need to extract the kubeconfig file and save it locally:
kubectl get secret/capd-kubeconfig -o jsonpath={.data.value} \
  | base64 --decode  > ./capd.kubeconfig
Now we can apply the CNI config, as suggested in the book.
KUBECONFIG=./capd.kubeconfig kubectl \
  apply -f https://docs.projectcalico.org/v3.12/manifests/calico.yaml
A minute later, both nodes should transition to Ready state:
KUBECONFIG=./capd.kubeconfig kubectl get nodes
NAME                              STATUS   ROLES    AGE   VERSION
capd-capd-control-plane-hn724     Ready    master   30m   v1.17.5
capd-capd-md-0-84df67c74b-lzm6z   Ready    <none>   29m   v1.17.5
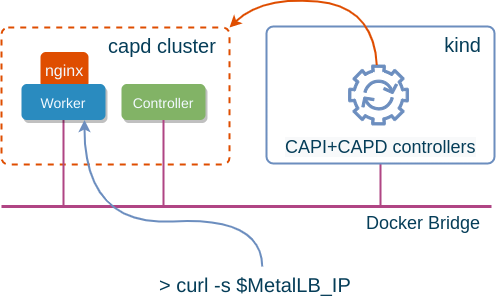
In order to be able to create load-balancer type services, we can install MetalLB in L2 mode. Thanks to the docker.sock mounting we’ve done above, our test cluster is now attached to the same docker bridge as the rest of the containers in host OS. We can easily determine what subnet is being used by it:
DOCKER_BRIDGE_SUBNET=$(docker network inspect bridge | jq -r '.[0].IPAM.Config[0].Subnet')
Next, using the ipcalc tool, we can pick a small range from the high end of that subnet:
DOCKER_HIGHEND_RANGE=$(ipcalc -s 6 ${DOCKER_BRIDGE_SUBNET} | grep 29 | tail -n 1)
Now we can create the configuration for MetalLB:
cat > metallb_cm.yaml <<EOF
apiVersion: v1
kind: ConfigMap
metadata:
  namespace: metallb-system
  name: config
data:
  config: |
    address-pools:
    - name: my-ip-space
      protocol: layer2
      addresses:
      - $DOCKER_HIGHEND_RANGE
EOF
Finally, all we have to do is install it:
KUBECONFIG=./capd.kubeconfig kubectl apply -f https://raw.githubusercontent.com/metallb/metallb/v0.9.3/manifests/namespace.yaml
KUBECONFIG=./capd.kubeconfig kubectl apply -f metallb_cm.yaml
KUBECONFIG=./capd.kubeconfig kubectl apply -f https://raw.githubusercontent.com/metallb/metallb/v0.9.3/manifests/metallb.yaml
KUBECONFIG=./capd.kubeconfig kubectl create secret generic -n metallb-system memberlist --from-literal=secretkey="$(openssl rand -base64 128)"
To test it, we can deploy a test application and expose it with a service of type LoadBalancer:
KUBECONFIG=./capd.kubeconfig kubectl create deployment test --image=nginx
KUBECONFIG=./capd.kubeconfig kubectl expose deployment test --name=lb --port=80 --target-port=80 --type=LoadBalancer
Now we should be able to access the application running inside the cluster by hitting the external load-balancer IP:
MetalLB_IP=$(KUBECONFIG=./capd.kubeconfig kubectl get svc lb -o jsonpath='{.status.loadBalancer.ingress[0].ip}')
curl -s $MetalLB_IP | grep "Thank you"
<p><em>Thank you for using nginx.</em></p>